Merchant Portal User Guide
Updated payment technology that enhances convenience, security, efficiency, accessibility, and data utilization, providing value both to businesses and consumers alike
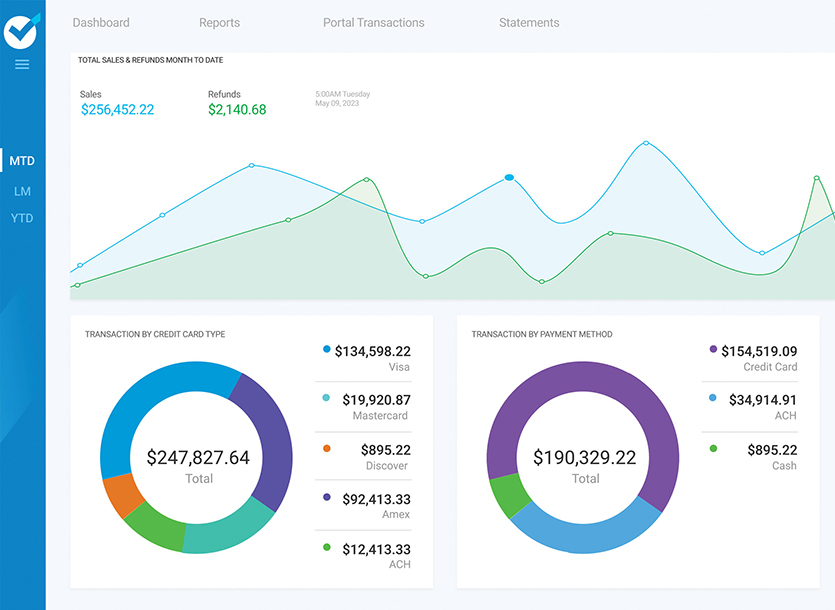
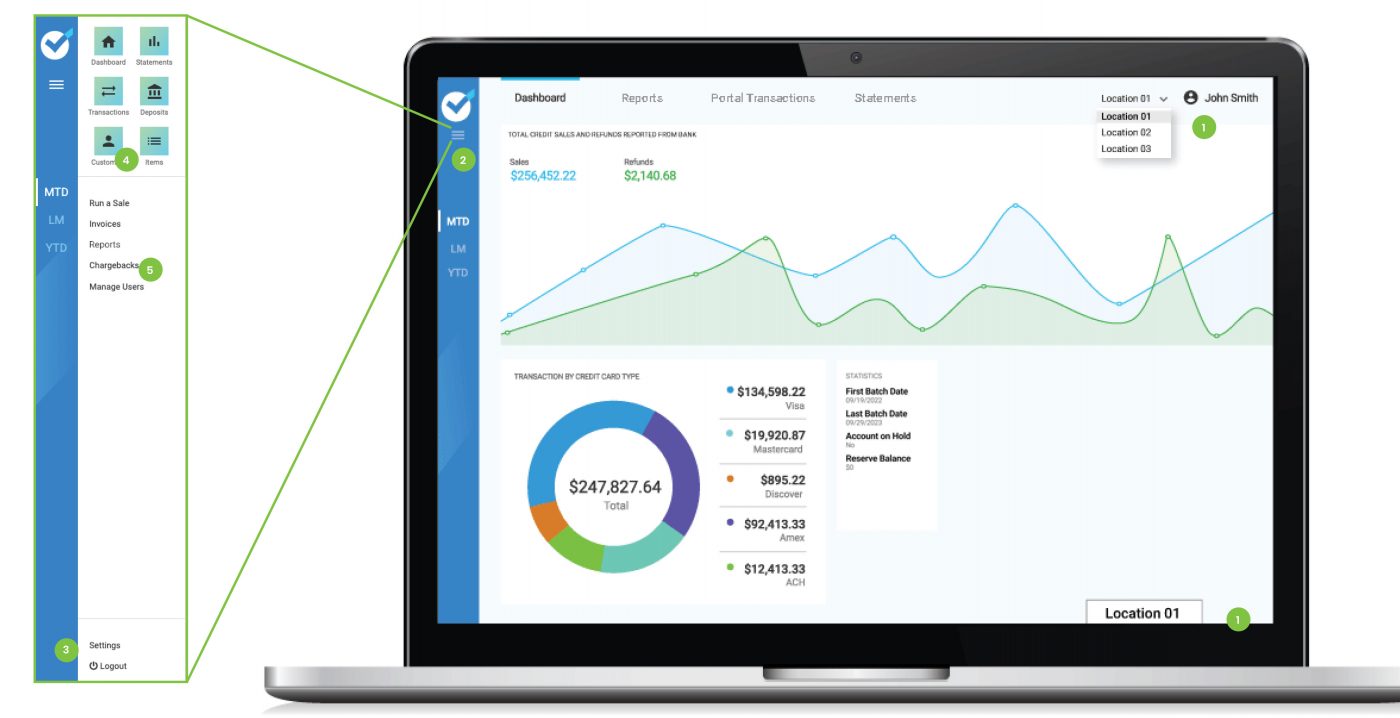
The Dashboard
- If you are registered with more than one business, you can click the business name in the upper right corner and select a different business. The selected business is labeled at the bottom right of the screen at all times.
- Click the icon in the blue left sidebar to open the menu drawer. Click again to close the drawer.
- Click on Settings at the bottom of the menu drawer to add or adjust the User Roles, Receipts, Payments, Communications & Reports. Click on Logout to exit the Portal.
- Click Customers and Items to create or edit this information.
- The eCommerce functions can be accessed using the list in the center of the menu drawer.

Run a Sale
The Run a Sale tab manages multiple eCommerce functions within the Portal.
- Transactions can be run as a Quick Charge, where an amount is entered and the sale is run, or as an Itemized Sale which creates an itemized list of products and the quantity and price of each. Note: Products in the itemized sale can be pulled from the items menu or typed in for a one time sale.
- The portal supports Dual Pricing and Surcharging. If the account is set for Dual Pricing, the screen will show two prices: Regular and Cash price instead of Total price. Note: If the account is set for surcharging, the screen will look like Total pricing. A surcharge line will be reflected on the receipt, if necessary, once the system determines if the card information indicates a credit or debit card and adjusts the amount accordingly.
- Complete the Tax Zip Code field ONLY if charging
Sales Tax. Note: The system can be set to automatically charge a specific tax amount on all sales, from the settings tab. In that case, this field would not appear but tax will be added to all sales. - Select a Customer if they are already saved in the system.
- Choose the Payment Method.
Note: If a customer has been selected and they have a card or ACH account on file, this information will also be included in the payment options. - Click the Receipt toggles to send electronic transaction receipts. You may select email, text or both. Note: If the customer is selected, the selected receipt option will send to the email and/or cell number on file. If no information is on file, or no customer is assigned, fields will appear in which to enter the information where the receipt should be sent.
- Toggle on Do Not Apply Tax if tax is automatically applied and the sale is tax exempt.
- Toggle on Recurring Billing to set a schedule of identical, continuing charges. This automatically activates Save Card on File. (See more on Page 16)
- Activate Save Card on File at the bottom of the screen to retain card brand information and call up the card for future transactions. Customer Information MUST be filled out in order to save the payment method. Per PCI compliance regulations, ONLY the last four digits of the card will be accessible to any user.
- Click the blue Charge button to complete the sale. Note: the Charge button will not be active until all required fields are completed
Once the sale is completed, the receipt can be viewed and printed from the Transactions tab.
The email receipt is sent from donotreply@choice.dev.
Make sure to inform the customer to add the choice.dev email as a contact in their email program. This will ensure the messages are not marked as spam or junk messages.
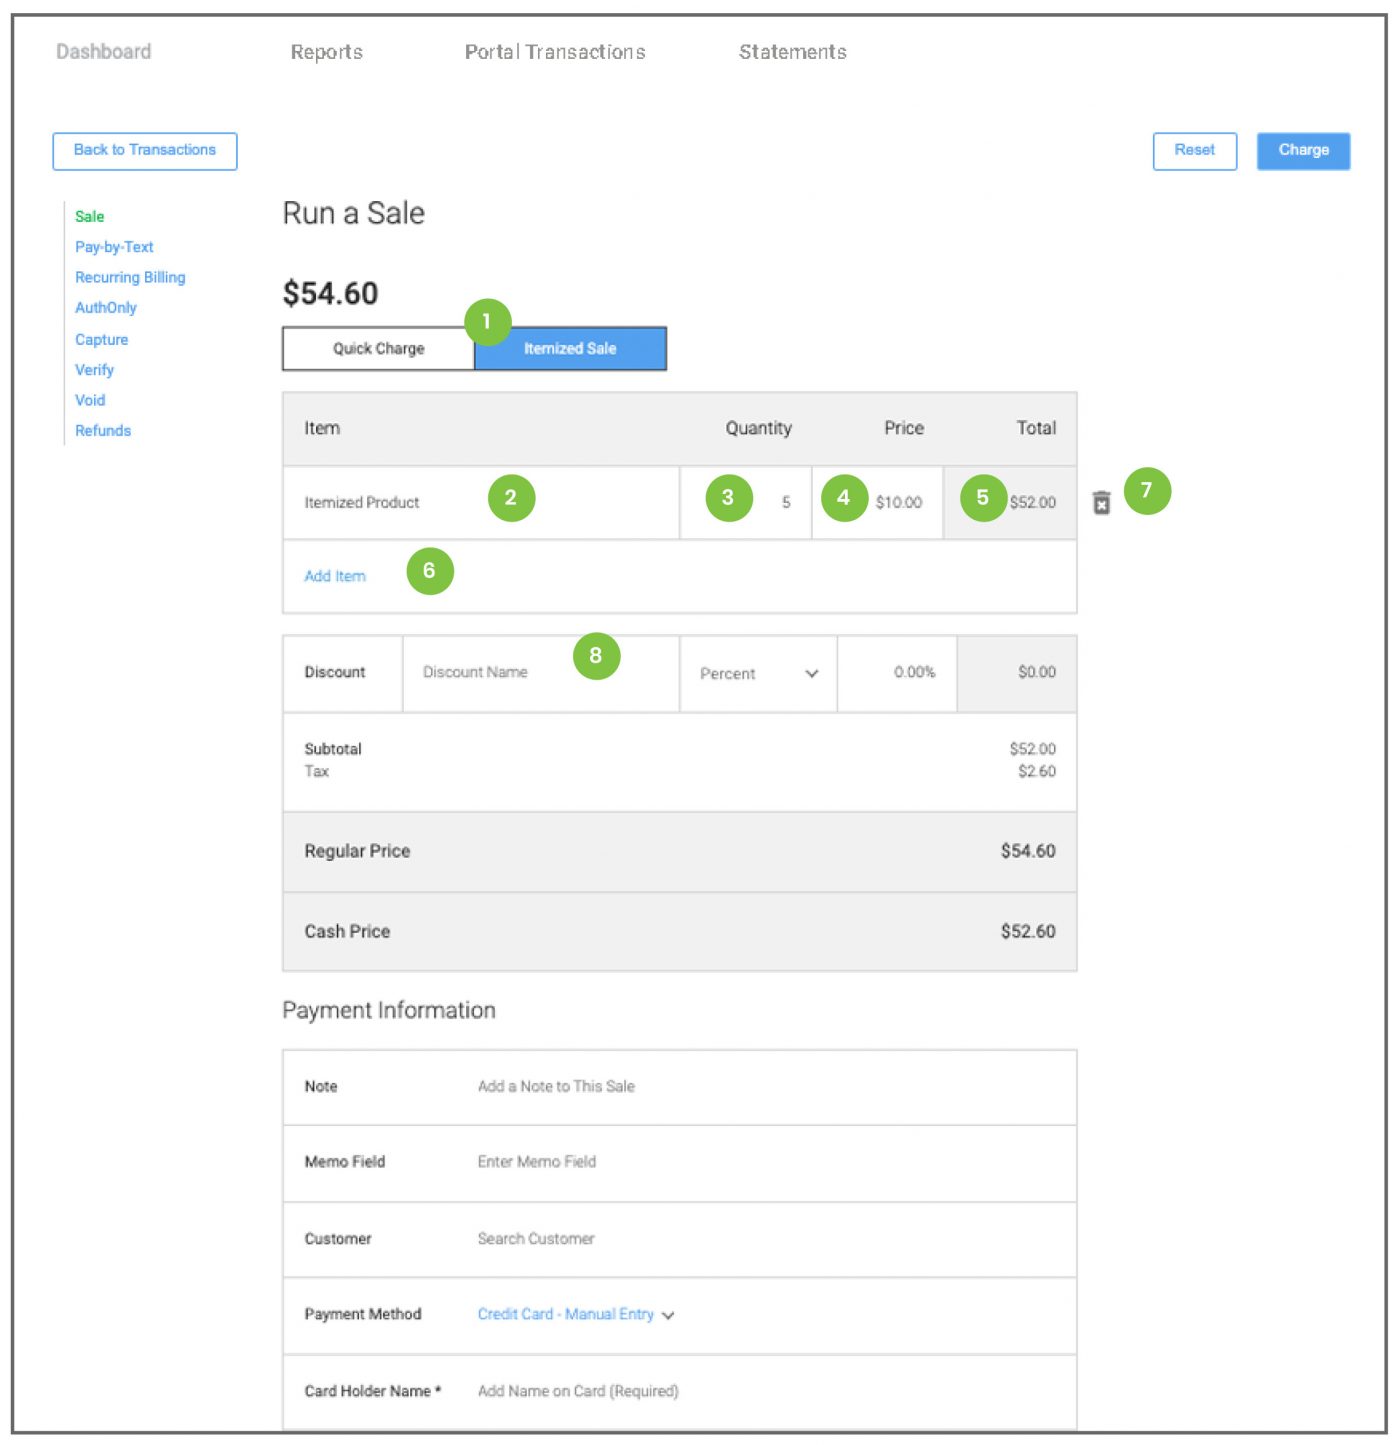
Itemized Sale
Itemized Sale in the Run a Sale tab adds the ability to create a detailed transaction record.
- Select Itemized Sale from the toggle bar at the top of the screen.
- Click the Item field and begin typing an item name. This will filter through any items in the Item menu and list the results on screen. Click the item you wish to add. Note: If the item being added is not in the menu, continue typing the item name and manually add it to the sale.
- Add the quantity.
- If the item being added comes from the menu, the price will be listed in this field. If the item is being manually entered, you must enter the price manually.
- The total will be calculated from the quantity multiplied by the price.
- Click Add Item to add additional items to the sale
- Click the Trash icon to remove an item from the sale.
- Click the Discount field and begin typing the name of the discount. This will filter through any discounts in the menu and list the results on screen. Click the discount you wish to add. If a discount being added comes from the discount menu, the percentage or dollar amount will be listed. If the discount being added is not in the menu, continue typing the discount name, select percent or amount and manually enter the discount amount.
The remaining steps to complete the sale are the same as the Quick Charge. (See page 8)
Note: The email receipt will be sent from donotreply@choice.dev.
Make sure to inform the customer to add the choice.dev email as a contact in their email program. This will ensure the messages are not marked as spam or junk messages.
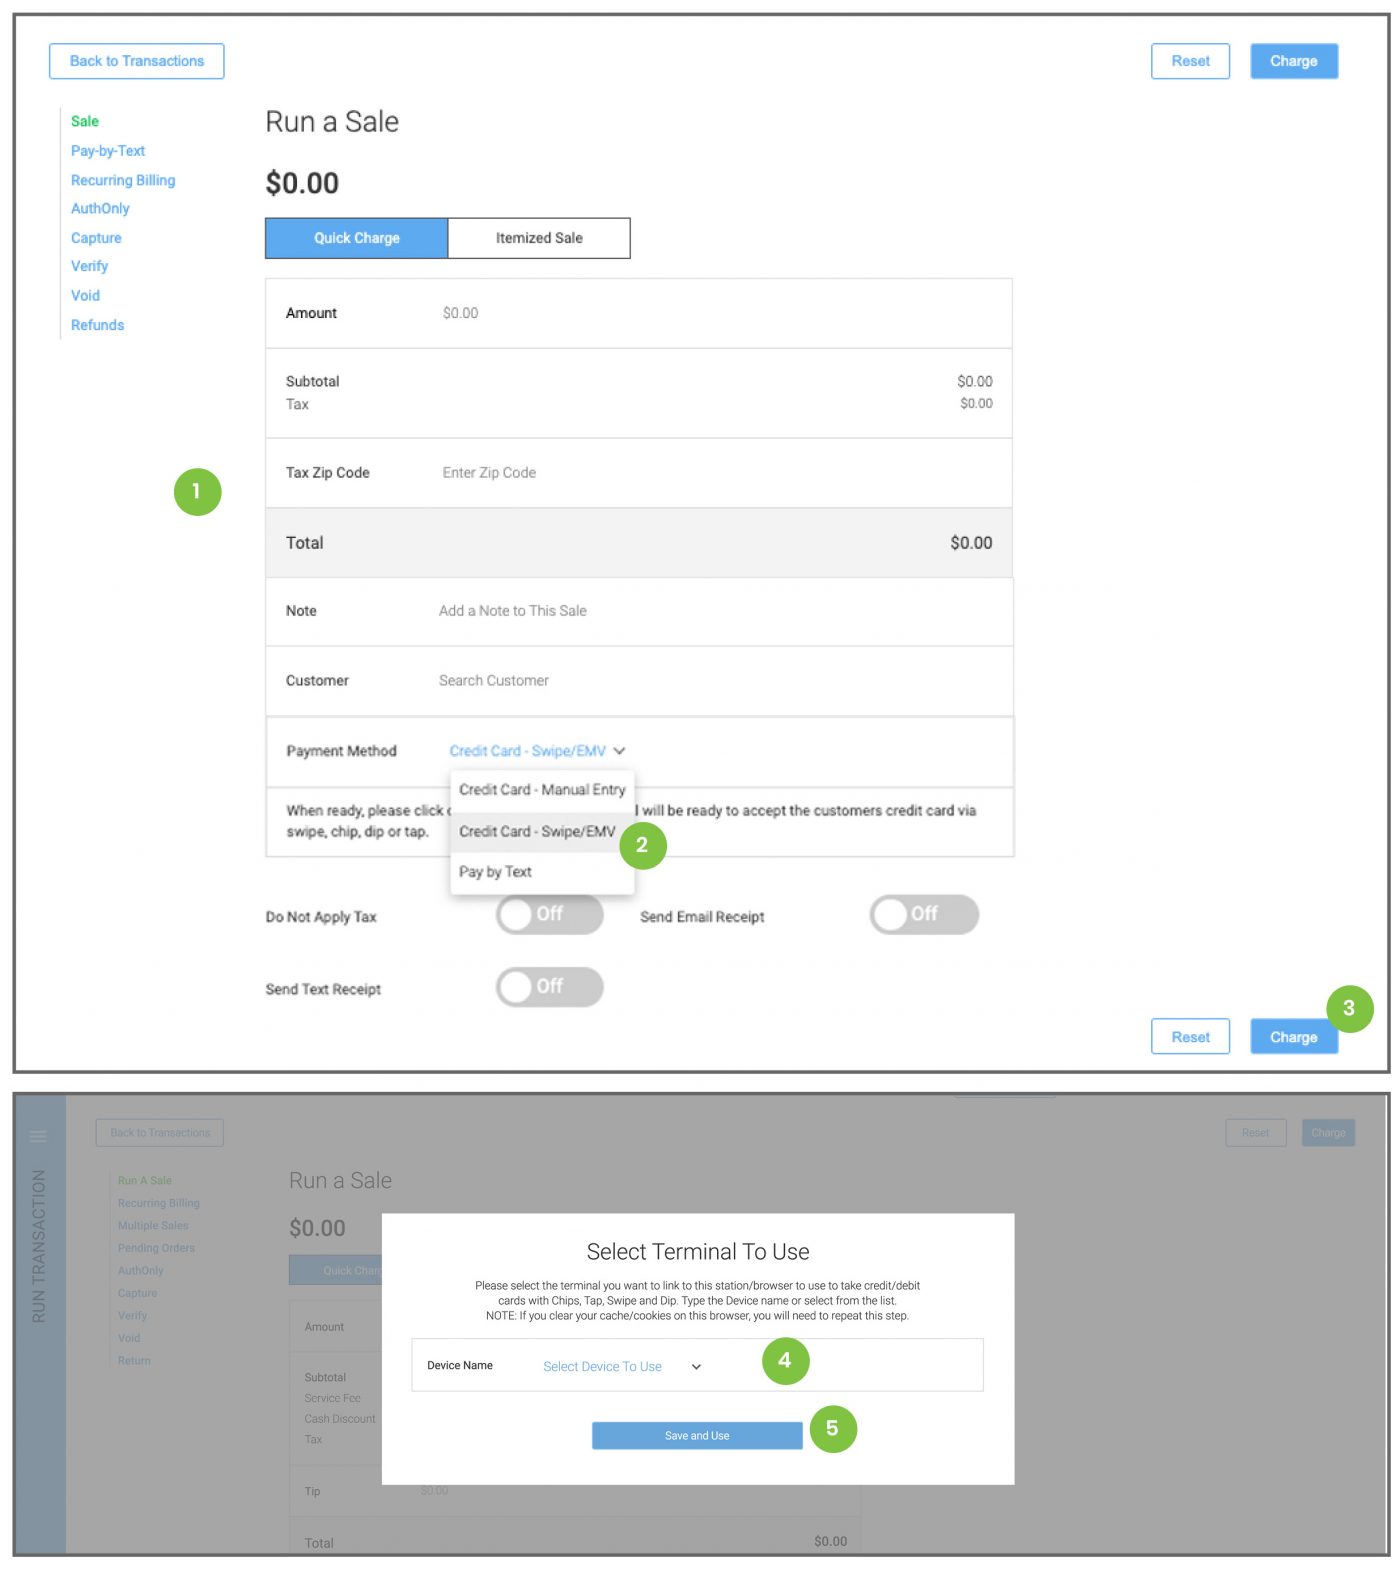
Terminal Sale
Credit card terminals can be semi-integrated with the business portal for card-present transactions. In this case, a physical terminal is added to the portal station, connected by WiFi or Ethernet connection.
- Transactions can be run as a Quick Charge or as an Itemized Sale. Enter the transaction information as
per usual. (See Run a Sale or Itemized Sale). - Select Credit Card – Swipe/EMV as the method of payment.
- Click the blue Charge button.
- A pop-up window will appear. From the drop-down menu, select the Terminal to Use. This will direct the portal to send a payment request to the correct device. Note: Merchants can have more than one device in their network. For example, users in different offices in a single location may each have their own device. In this case, all devices will be listed in the drop-down menu. It is important to select the correct terminal so the payment request is sent to the station needed to process the sale.
- Click the blue Save and Use button.
Note: The portal will save the terminal selection to the browser cache. Once the selection is made, the portal will automatically send payment requests to the same device. To change devices, the browsing data (cache) must be cleared. This will require the user to log into the portal again in order to proceed with sales. Once the cache is cleared, the user will then be able to select a new device for a swipe sale. - The selected device will now light up and request the customer to enter or swipe their card. If signature is required, they will sign the screen and complete the sale. If PIN is required, they must enter their PIN to complete the sale. Once complete, the terminal sends the transaction information back to the portal and the user can see the results on screen.
Note: The terminal will print a paper receipt at the end of the transaction. Users can also email or text receipts to the customer by selecting that option when creating the sale.
Note: The email receipt will be sent from donotreply@choice.dev.
Make sure to inform the customer to add the choice.dev email as a contact in their email program. This will ensure the messages are not marked as spam or junk messages.
Pay by Text
Pay by Text is a payment option in the Run a Sale tab. This option will send a secure payment link to the customer by email and/or SMS message. This can be done from either Quick Charge or Itemized Sale.
Enter the transaction information on the sale screen.
Select Pay-by-Text from the Payment Method drop-down menu.
Select the receipt option. This will determine how the customer receives their payment request. You may select email, text or both.
Note: If the customer is assigned to the sale, the selected receipt option will send the payment link to the email and/or cell number on file. If no information is on file, or no customer is assigned, fields will appear in which to enter the information where the receipt should be sent. To send to more than one email or cell number, click the blue plus sign next to that field and a second or third field will appear.
Click the blue Charge button to complete the sale. The customer will receive the payment request and can make payment electronically Note: The email request will be sent from donotreply@choice.dev. Make sure to inform the customer to add the choice.dev email as a contact in their email program. This will ensure the messages are not marked as spam or junk messages.
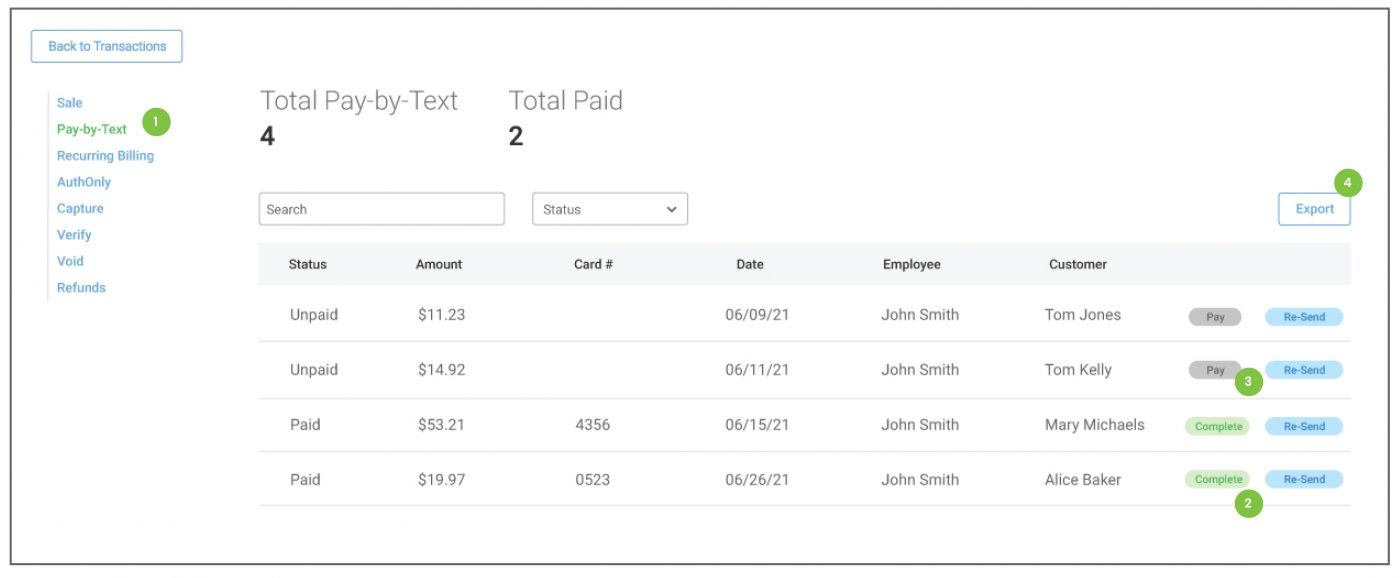
- Click Pay-by-Text from the sale menu on the left side of the screen to review all active Pay-by-Text requests. Displayed results can be custom sorted using the search field. The system holds Pay-by-Text records for the calendar month. At the beginning of each month, the previous Pay-by-Text records are removed.
- Completed payments can be removed from the list by clicking the Complete button on the right side of the screen.
- Unpaid requests have a button to Resend the request as well as a Pay button. Clicking the pay button will reload the transaction information into the sale screen for manual payments.
- Screen results can be exported to a CSV by clicking the Export button.
Completed payments are listed in the Transactions tab and are batched nightly.
Recurring Billing
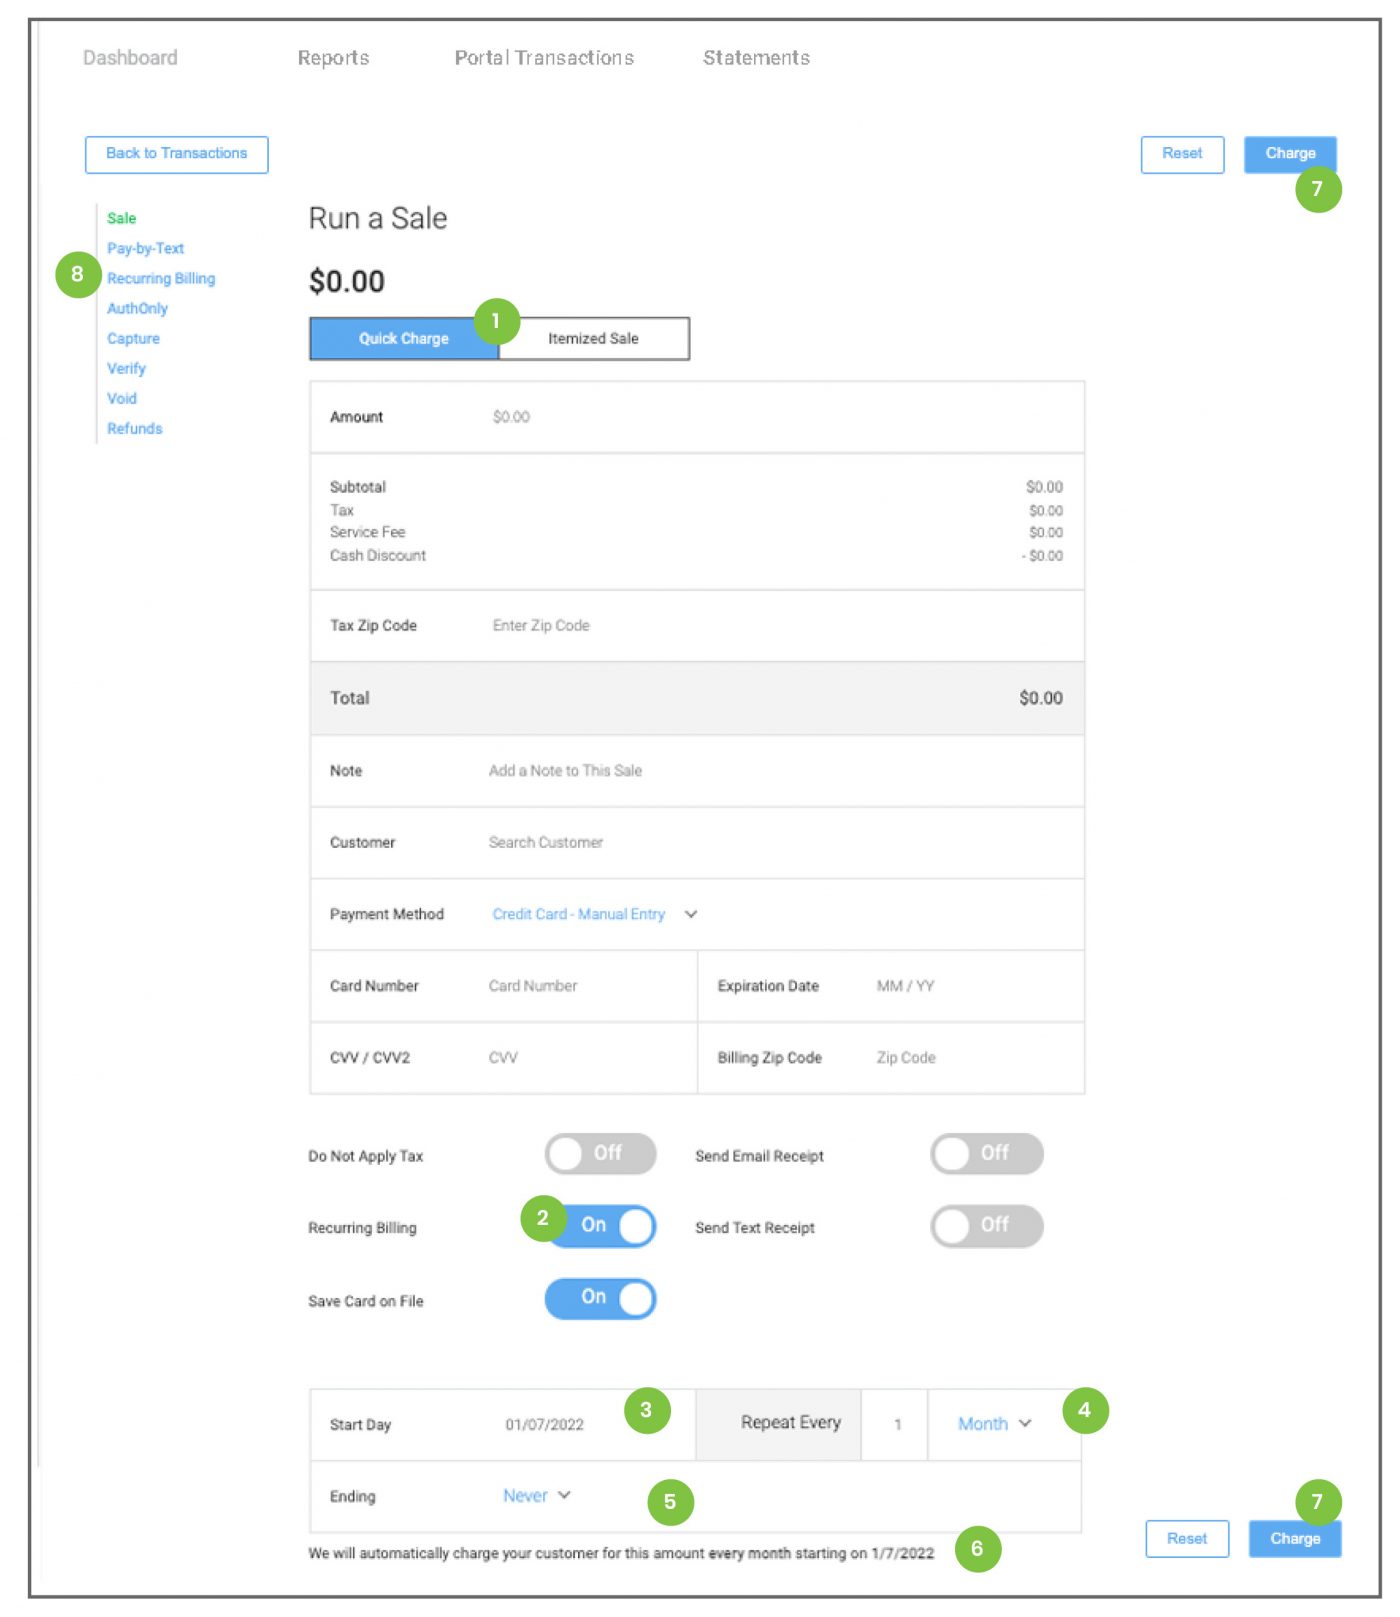
Recurring Billing in the Run a Sale tab adds the ability to create a repeating schedule of credit or ACH charges.
- Transactions can be run as a Quick Charge, or as an Itemized Sale. Enter the transaction information on the sale screen. This information will be part of every charge in the recurring payments. Select Credit or ACH from the Payment Method drop-down menu.
- Toggle on Recurring Billing. Additional fields will now appear at the bottom of the screen to set the recurring schedule. Note: Once this is selected, the Save Card on File toggle activates as well. Account information must be tokenized to process future charges.
- Select the Start Day. This sets the date or day of the week/month/year that the charge will take place. Note: The date defaults to the current day. If a customer wants to be charged on the 15th of the month, the schedule must be set to a start date of the 15th.
- Select how often the charge will Repeat. The options are intervals of daily, weekly, monthly, or yearly.
- Choose the End of the schedule. Never indicates and continuing charge. Other options include setting a specific date or ending the schedule after a certain number of charges have been successfully completed.
- At the bottom of the screen is a descriptor which outlines the settings chosen. How often they will be charged, when it will begin and when it will end.
- Click the blue Charge button to complete the sale.
- Click Recurring Billing from the sale menu on the left side of the screen to review all Recurring transactions. These can be sorted by activation status or custom sorted using the search field.
- Click the blue icon bar on an individual line item to View, Edit or review the Payment History of and transaction schedule
- Recurring schedules can be edited. Users can change the card or account information or adjust the schedule frequency and end date. There is a Deactivate button on the right side of the screen if a customer chooses to end the recurring charges.
- It is also possible to create a Scheduling Pause on any active recurring schedule. Two additional fields appear at the bottom of the edit screen. These assign a start and end to a scheduling pause. This allows the user to put a recurring schedule on hold and the system will re-start the charges once the pause end-date is reached.
- Completed payments are listed in the Transactions tab.
Authorization & Capture
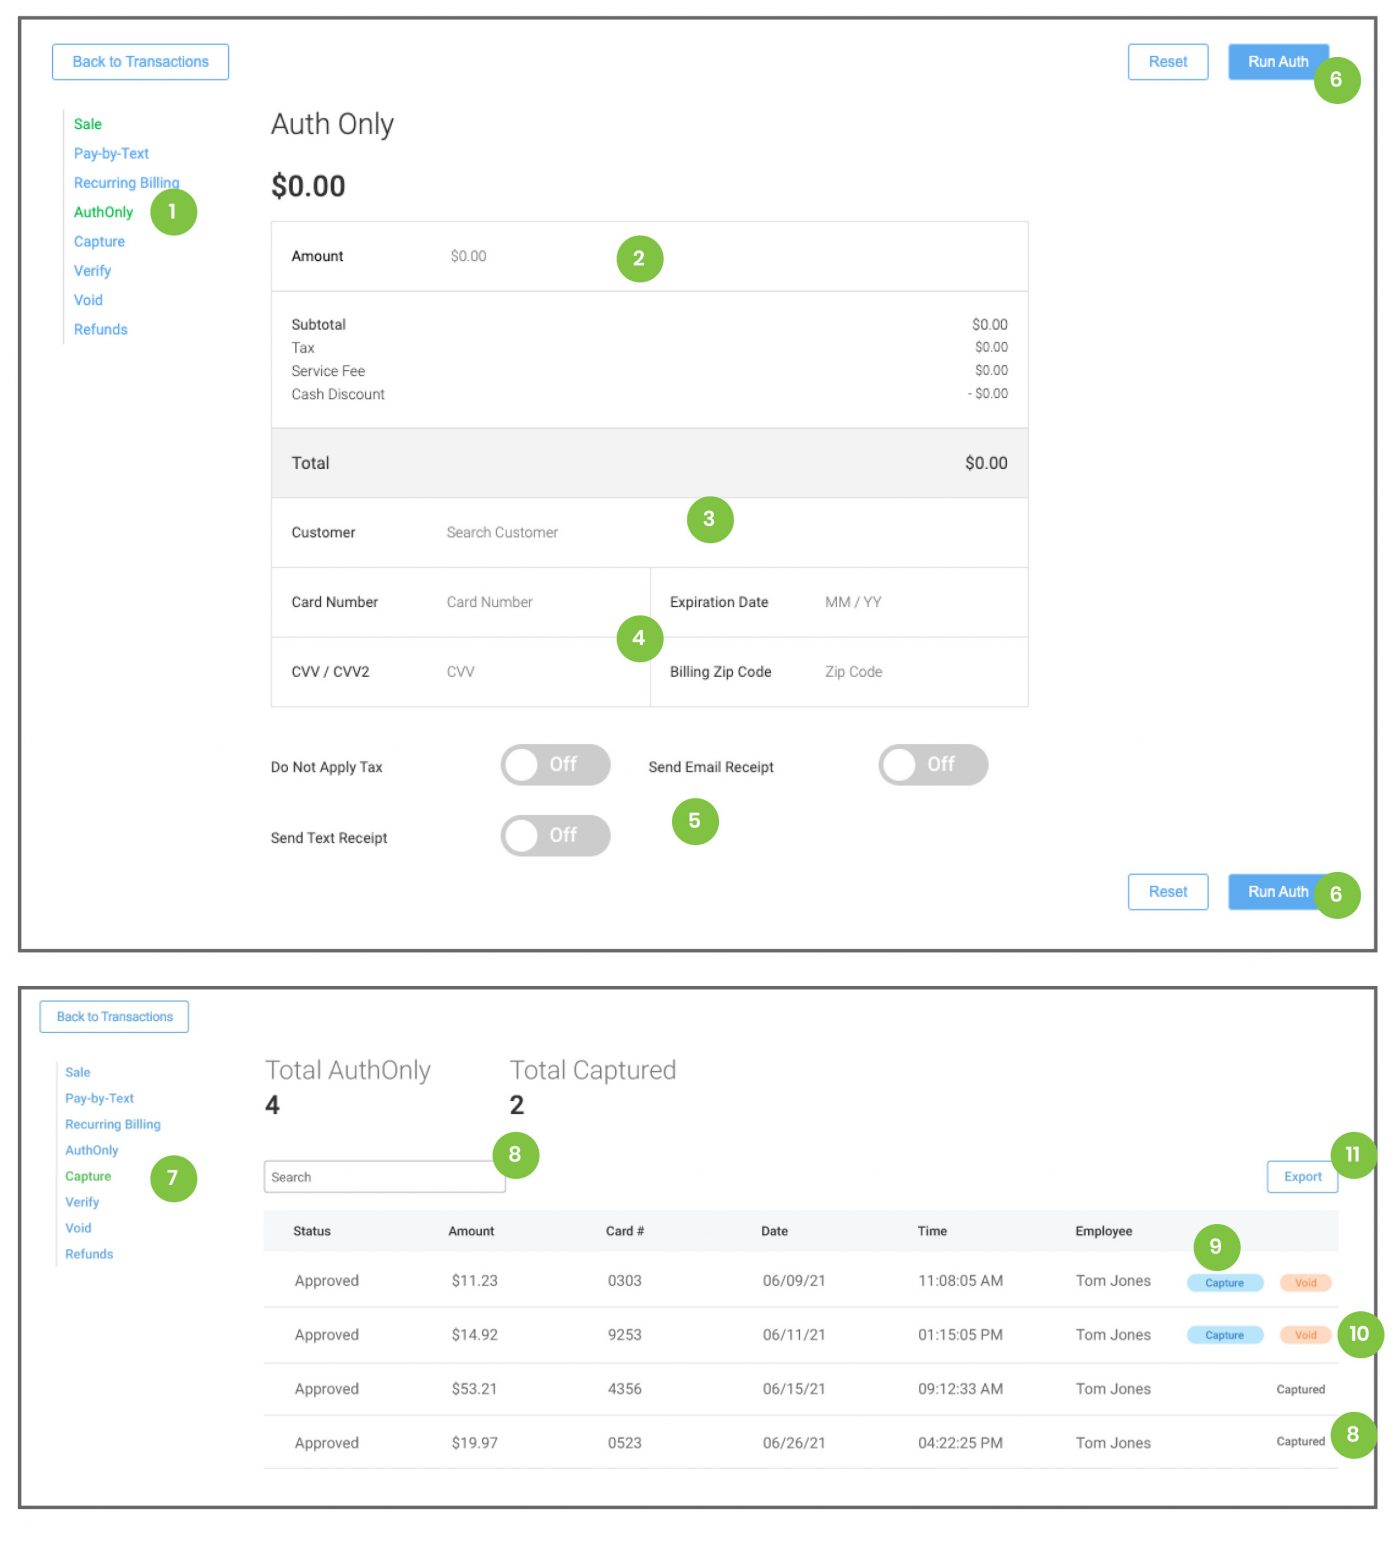
AuthOnly in the Run a Sale tab adds the ability to create and hold an authorization of a specific amount a credit card.
- Select Auth Only from the sale menu on the left side of the screen.
- Enter the amount to be authorized.
- Select a Customer if they are already saved in the portal system. Click the Customers button in the left side menu to add a customer to the portal system.
- Enter the credit card information
- Click the Receipt toggles to send electronic receipts for the authorization. You may select email, text or both.
Note: If the customer is selected, the selected receipt option will send to the email and/or cell number on file. If no information is on file, or no customer is assigned, fields will appear in which to enter the information where the receipt should be sent. - Click the blue Run Auth button to complete the auth. Note: Authorized amounts will remain able to be captured for up to seven business days.
- Click Capture from the sale menu on the left side of the screen to review and capture any auths.
- Displayed results can be custom sorted using the search field. Auths already captured will be labeled.
- Click the blue Capture button on the right side of the screen to capture each auth. This will create a pop-up window which will prompt the user to enter the amount to be captured. It is possible to adjust the amount to less than the original authorization, or to add a tip to the transaction. Each card brand determines the amount above the original authorization that can be captured.
- Click the red Void button to release the hold of funds on the card before the expiration time.
- Auth and Capture reports can be exported to a CSV by clicking the Export button.
- Completed payments are listed in the Transactions tab.
Voids and Refunds
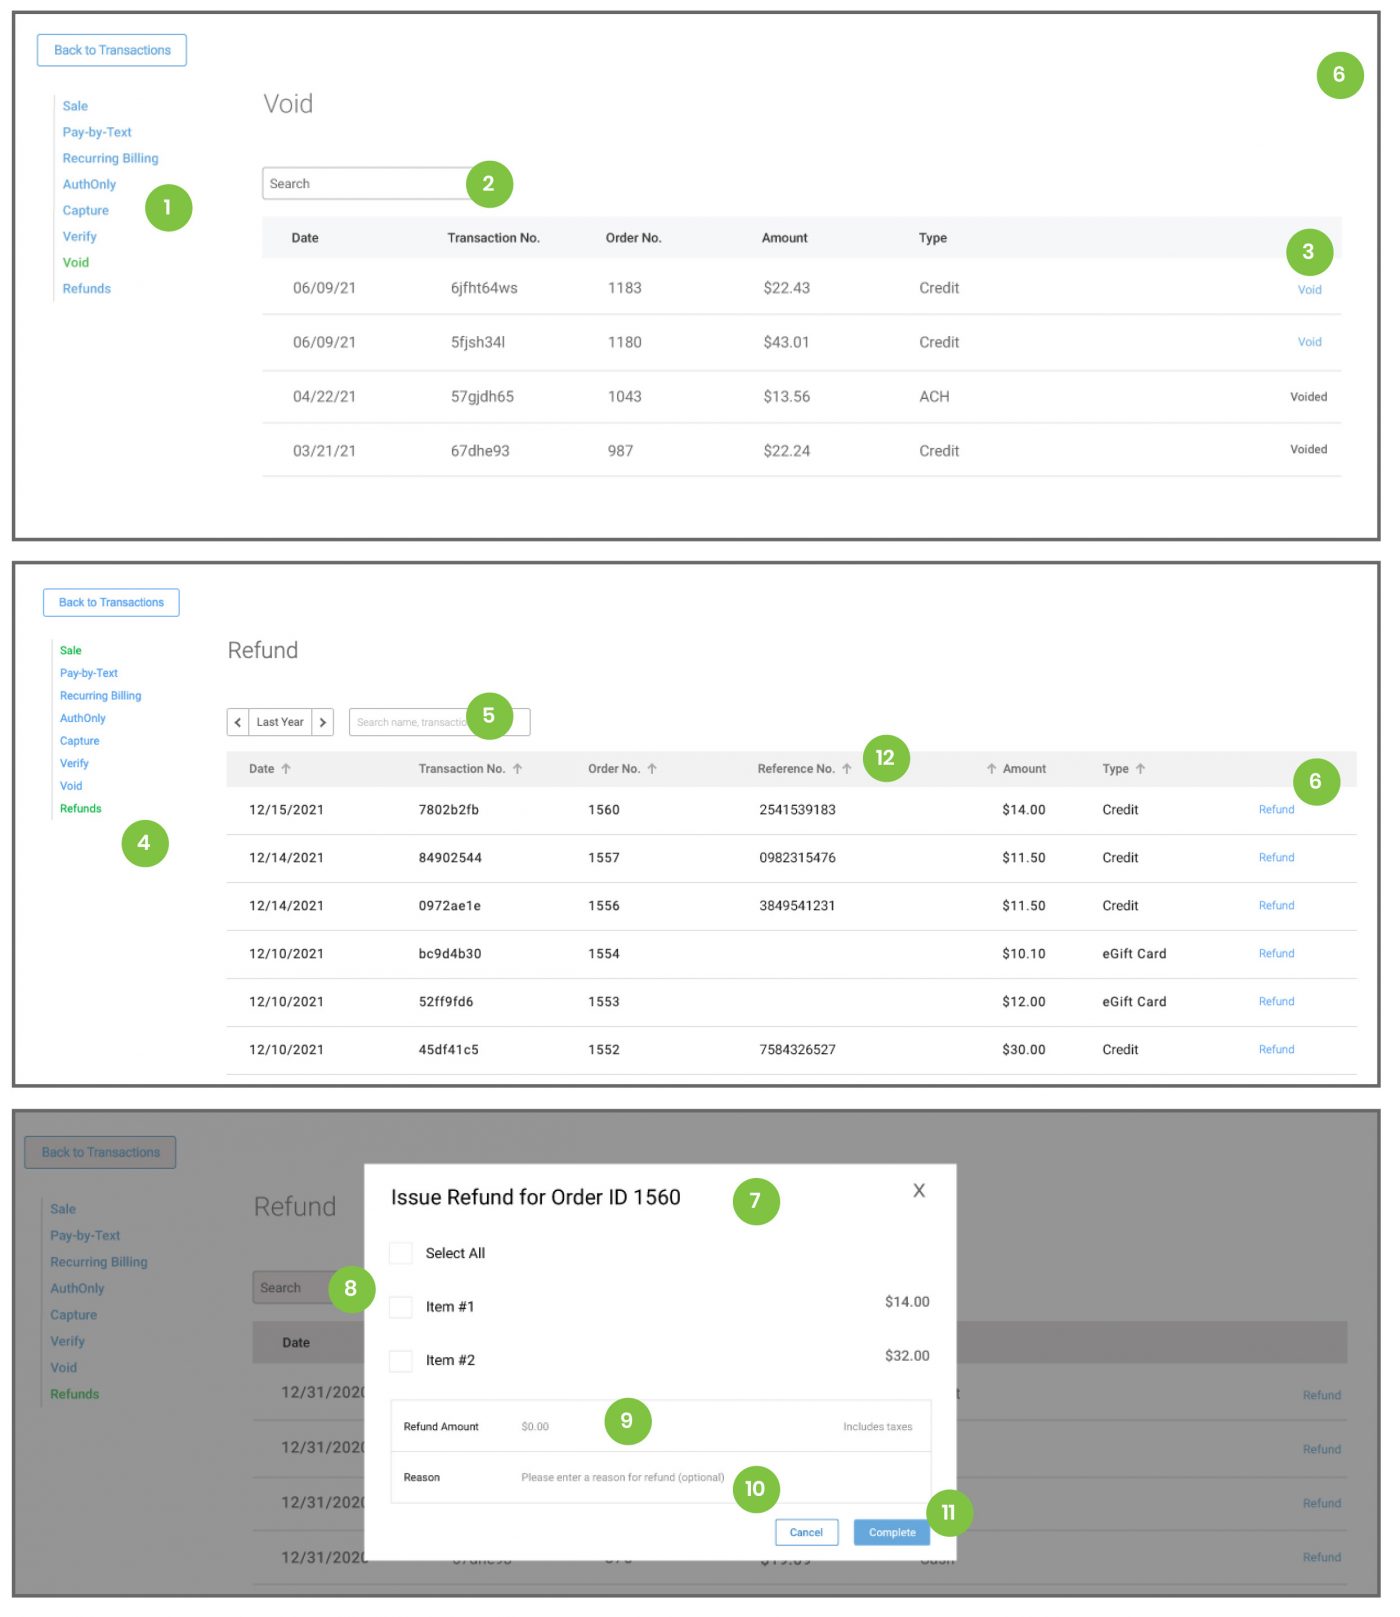
Voids and Refunds in the Run a Sale tab are used to return money to the customer. Transactions can only be voided before they are batched. Once batched, money must be returned by refund.
- Select Void from the sale menu on the left side of the screen.
- Displayed results can be custom sorted using the search field. Note: Only transactions eligible for void will be listed.
- Click Void on the right side of each transaction.
Note: this will clear the sale from the system. Transactions
run on a connected device will require the user to authorize the return on the same device on which the sale was run. - Select Refunds from the sale menu on the left side of the screen.
- Displayed results can be custom sorted using the search field. Note: Only transactions eligible for refund will be listed. This includes any cash sales reported in the portal.
- Click Refund on the right side of each transaction.
- This will create a pop-up window with a list of each item in
the sale. Refunds can be created for a full or partial amount. - Click to select individual items for an itemized or partial refund. Note: Refunds on sales that include tax will have tax added to each item that is refunded
- It is also possible to click the Refund Amount field and type
in an amount to return a specific dollar amount. - Notes can be added for merchant records
- Click Complete to process the refund.
- Transactions run on a connected device will confirm the refund or void.
Completed payments are listed in the Transactions tab. Refunds are listed in the original transaction receipt, below
the original sale information.
Note: Transactions can also be voided or refunded from the transactions Tab. Locate the correct sale, click on the green View icon and click the Refund or Void button at the bottom of the screen. Follow the prompts to complete the process.
Invoices
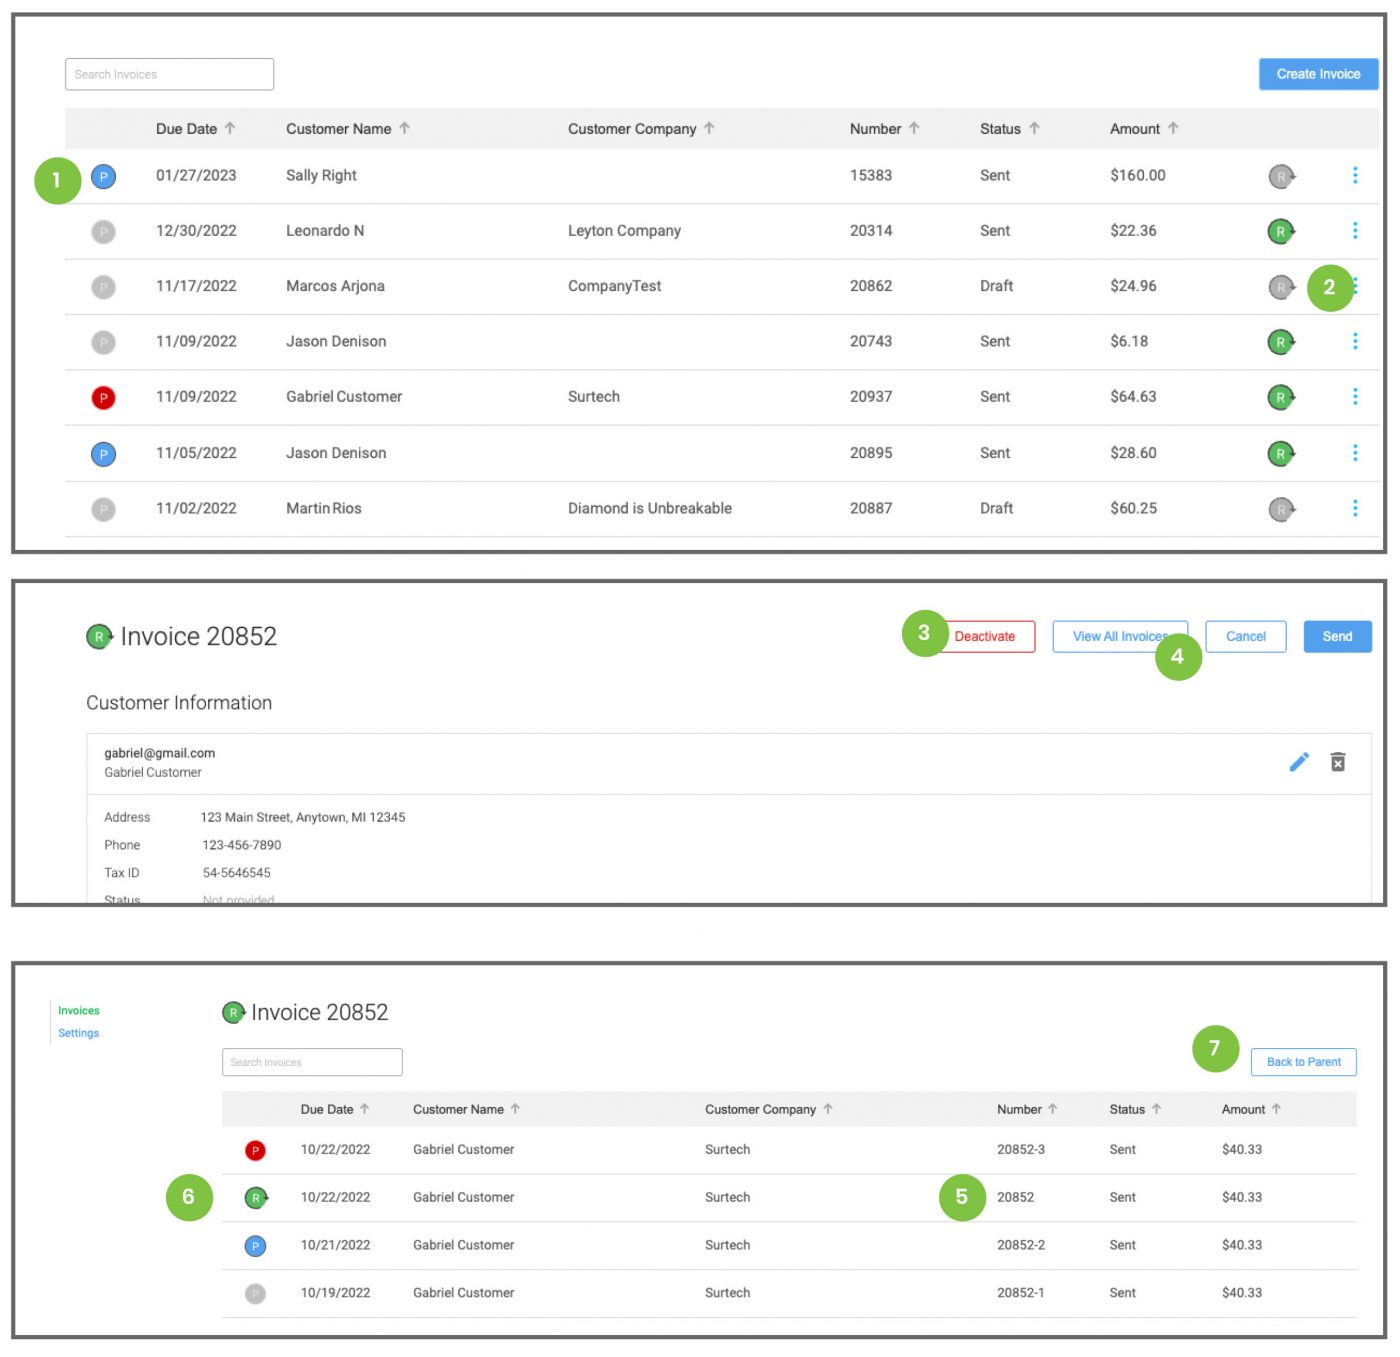
From the Invoices tab, create and manage electronic requests for payment with advanced due dates. The main reporting screen for invoices uses an icon system in the left column to indicate the payment status of each invoice. Grey: Not Yet Due; Blue: Paid; Red: Past Due. Green icons in the right column indicate recurring invoices
- Click the Settings option from the left side menu. In this section set any default messages for the Memo and Footer sections of the invoices. This will apply to all invoices sent from the portal and can be edited as each invoice is created.
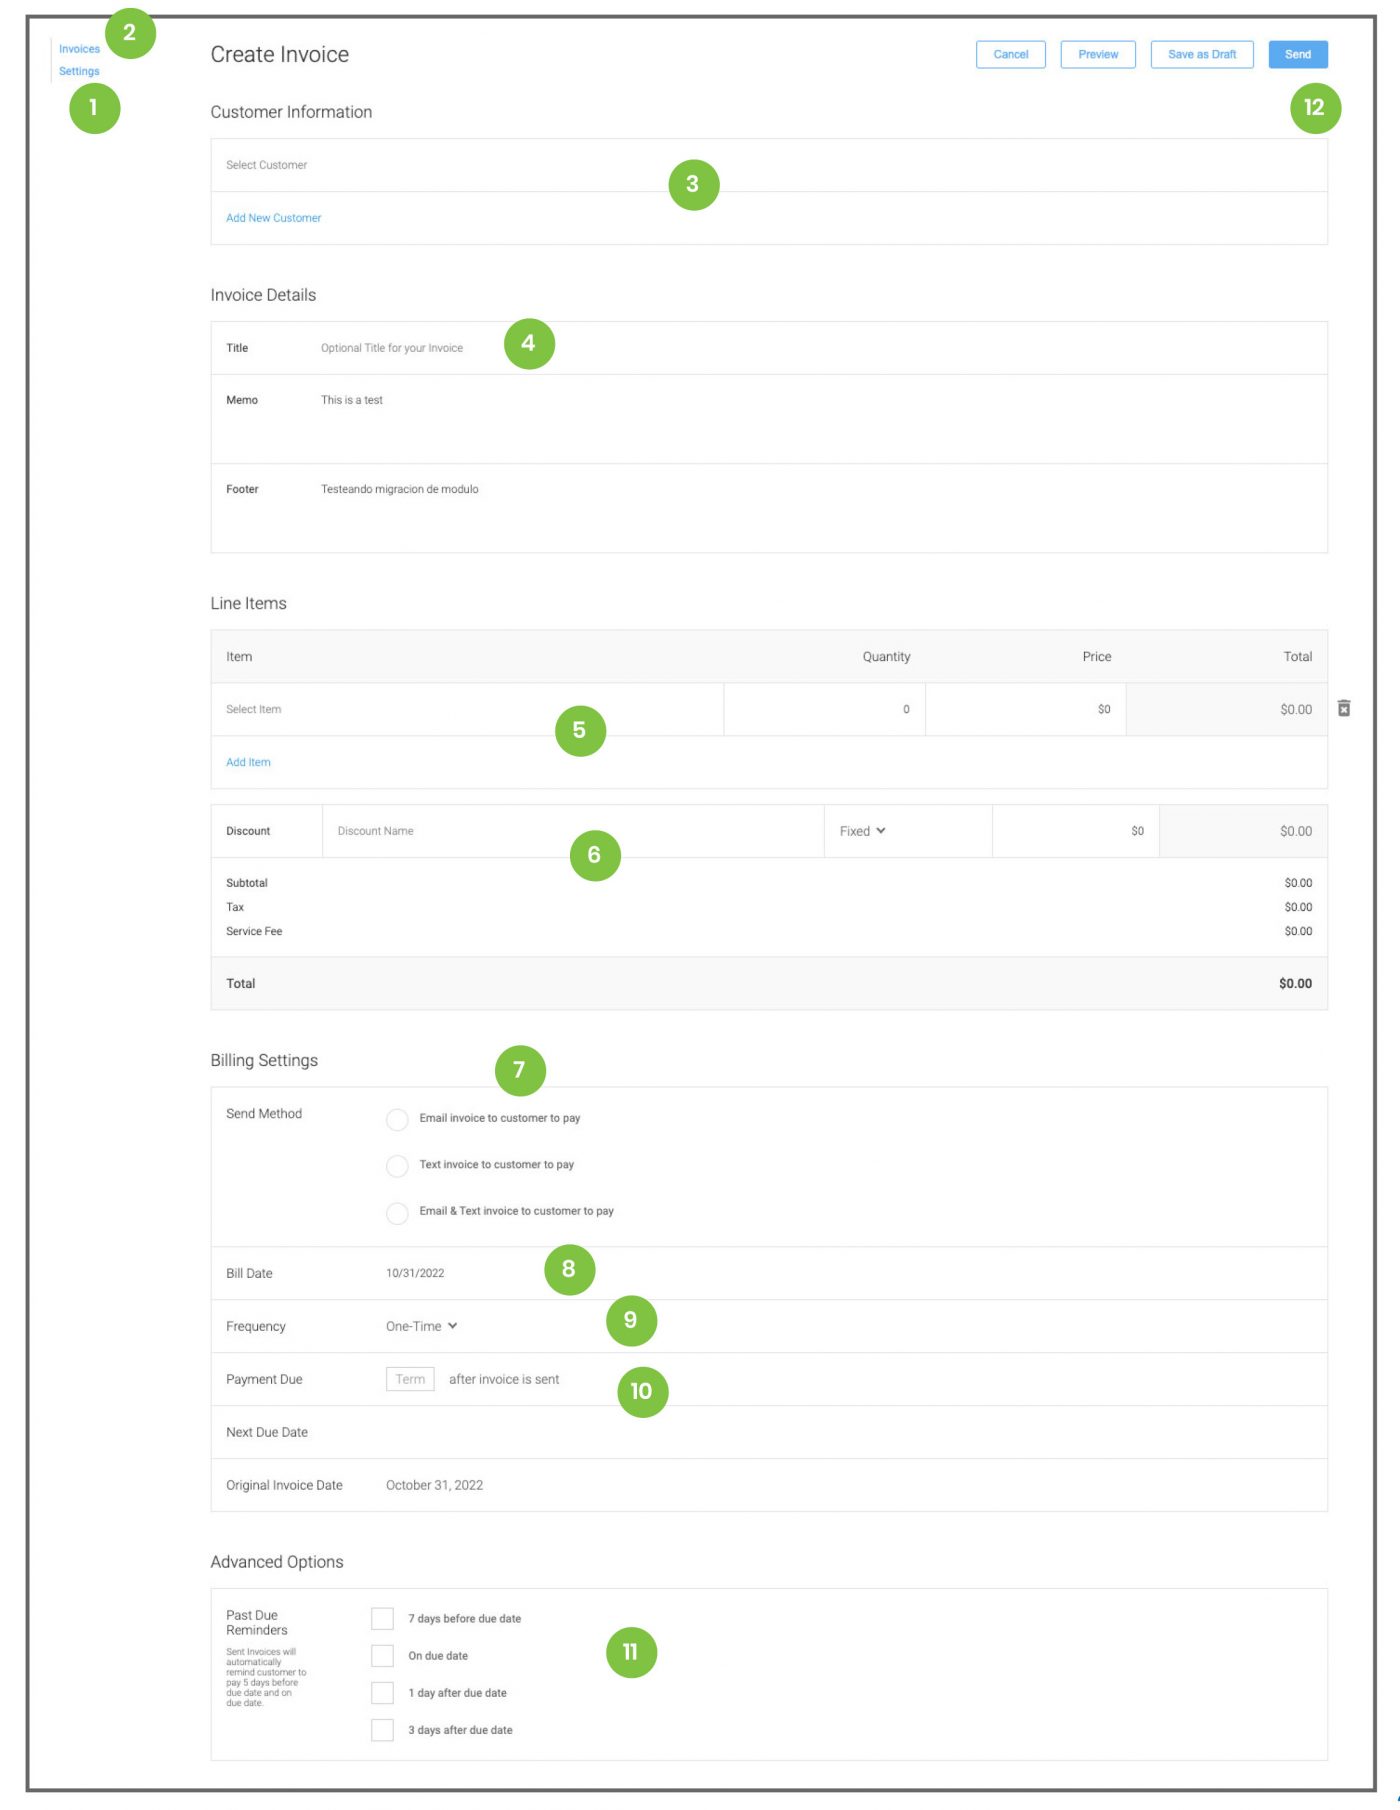
- Click the Invoices option from the left side menu. The reporting screen will display all invoices with their payment status. Click the blue icon bar on the right side of the screen to view and edit invoices. Click the blue Create Invoice button to create a new invoice.
- Click Select Customer and begin typing the name of the customer on file. If the customer is not on file, click Add New Customer to add them to the system. Note: The customer must be in the system to send an invoice.
- Enter a Title for the invoice and then enter or edit the Memo and Footer text.
- Select or type Items, Quantity and Price to build the invoice content.
- Click the Discount field and begin typing the name of the discount. This will filter through any discounts already created in the item menu and list the results on screen. Click the discount you wish to add. If the discount being added is not in the menu, continue typing the discount name, select percent or amount and manually enter the discount amount.
- Choose the send method.
- Select the date the invoice will be sent.
- The default frequency for invoices is One Time. Click the Frequency field to set a schedule for recurring invoices. Note: If a schedule is selected, an additional field will appear to choose the due date of each future invoice.
- Select the due date for the invoice. Choose a preset option or a custom date.
- Click to select Past Due Reminders. These will set the portal to re-send the invoice with a reminder for payment on each of the dates selected. If the customer makes payment, these reminders will not be sent.
- Click the blue Send button to send the invoice. Note: If the invoice send date is set for a future day, the invoice will not send until the date selected. Click the Save as Draft button to save the invoice for future edits. The invoice will not send until the send option is selected.
Recurring Invoices
The Invoices tab will list all original invoices created in the portal.
- The icon to the left of each invoice indicates the payment status. Grey: Not yet due; Blue: Paid; Red: Past due
- The icon to the right of each invoice indicates if the invoice is a one-time or recurring invoice. Recurring Invoices will only display the original (Parent) invoice on this tab. To view all of the invoices in a schedule, click the parent invoice.
- Click Deactivate to end the recurring schedule of invoices.
- Click View All Invoices to see the list of all invoices sent in this recurring schedule. Note: The View All Invoices button only appears on a recurring invoice screen.
- The recurring invoice screen will list the parent invoice and any invoices already sent in the schedule. Future invoices will not list until they are sent to the customer. The Invoice Number for all invoices in a series remains the same, with an additional number added to indicate where the invoice falls in the series.
Note: It is possible to edit any invoice that has not been paid. Editing an individual invoice that is part of the series will effect only that single invoice. Editing the Parent Invoice will update all unpaid invoices in the series, and any future invoices. - The Parent Invoice can be identified by the presence of the Recurring Icon in payment status column.
- Click Back to Parent to go back to the original Parent Invoice.
Note: The colored payment indicator of the parent on the Invoices tab will change to indicate the status of the invoices in that series. If a recurring invoice is past due, the icon will turn red. If all invoices are paid, it will turn blue. If an invoice is pending, but not yet due, it will be grey.
Customers
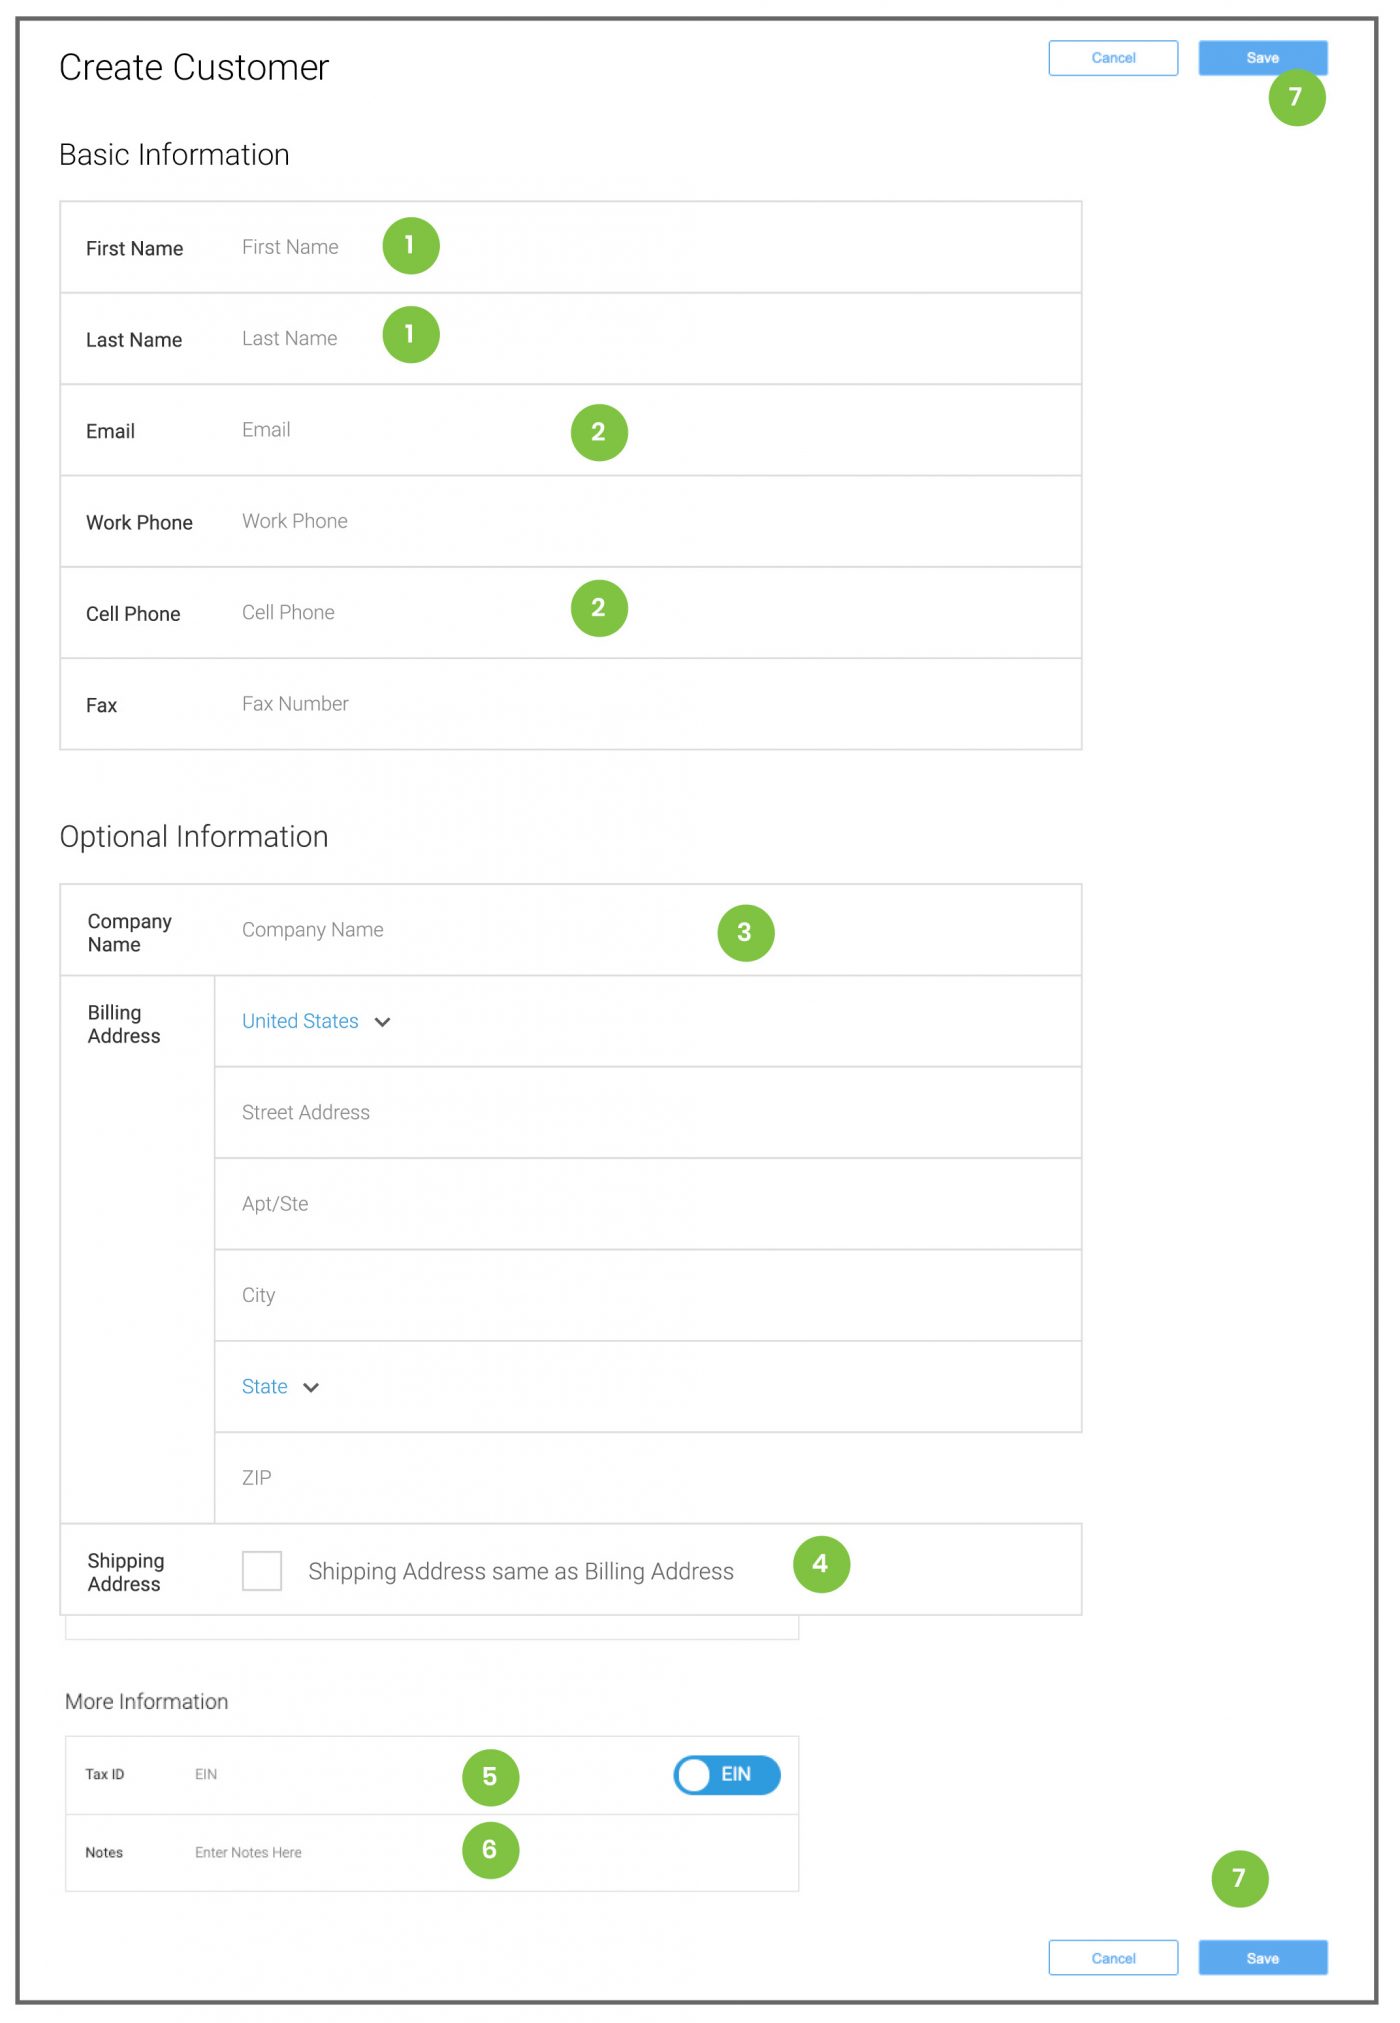
From the Customers tab, create and manage a customer database. This makes sending receipts and invoices fast and easy. It is also possible to save accounts on file for customers in the portal to make repeat payments simple. All customers are listed in this tab. Lists can be custom sorted using the search field. Note: Click on the blue icon on the right side of the screen to view, edit or delete a customer from the database. Click the blue Create Customer to add a new customer.
- Enter the customer’s First and Last name.
- Enter the customer’s Email and Cell Phone. These are used to send receipts, invoices and pay by text requests. Note: the remaining customer information is for memo purposes only. Future system updates will add analytics and additional reporting capabilities.
- Enter Company Information for corporate accounts.
- Uncheck the Shipping Address same as Billing Address and add additional shipping information, if needed.
- Enter tax information. Toggle between EIN or SSN information as needed.
- Add Notes for customer service or account information.
- Click the blue Save button to add customer to the database.
Items and Discounts
From the Items tab, create and manage an extensive product menu. This includes Discounts, Categories and menu Items.
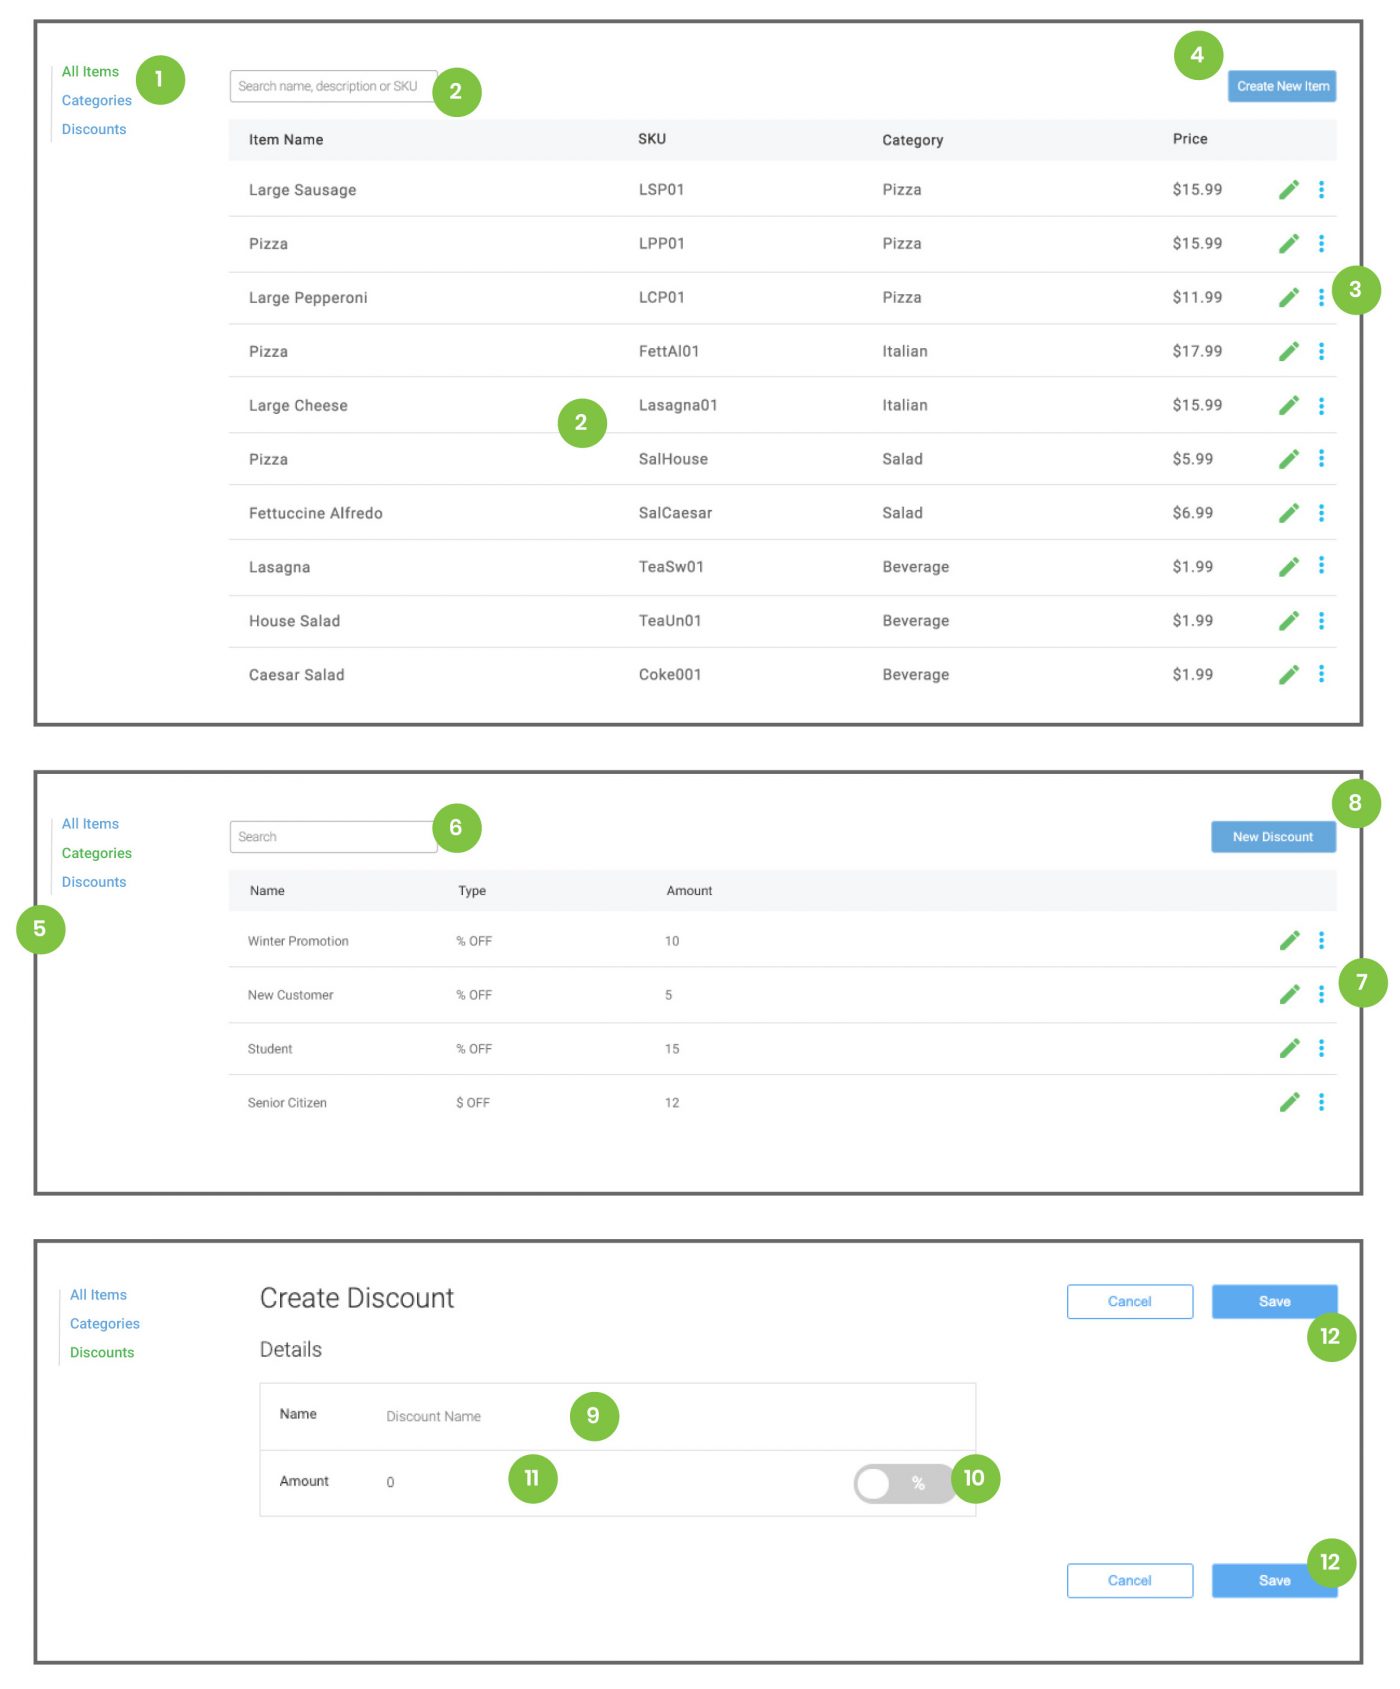
- Click the All Items option from the left side menu.
- Displayed results include Name, Category, Price and SKU, if any. These can be custom sorted using the search field.
- Click the blue icon bar on an individual line item to View, Edit or Delete an item.
- Click the blue Create New Item button to manually add more items or create a Payment Button.
- Click the Discounts option from the left side menu.
- Displayed results include Name, Type of Discount (Percentage or Dollar amount) and the Amount to be discounted. These can be custom sorted using the search field.
- Click the blue icon bar on an individual discount item to View, Edit or Delete.
- Click the blue New Discount button to create and name a new discount.
- Name the Discount.
- Click the toggle to choose between a Dollar amount or Percentage.
- Enter the Amount to be discounted.
- Click the blue Save button to save the new discount.
Once saved, all information in the portal is immediately available to be applied to sales.
Categories
From the Items tab, create and manage Categories and Modifiers to organize and add specific requirements to products in the product menu.
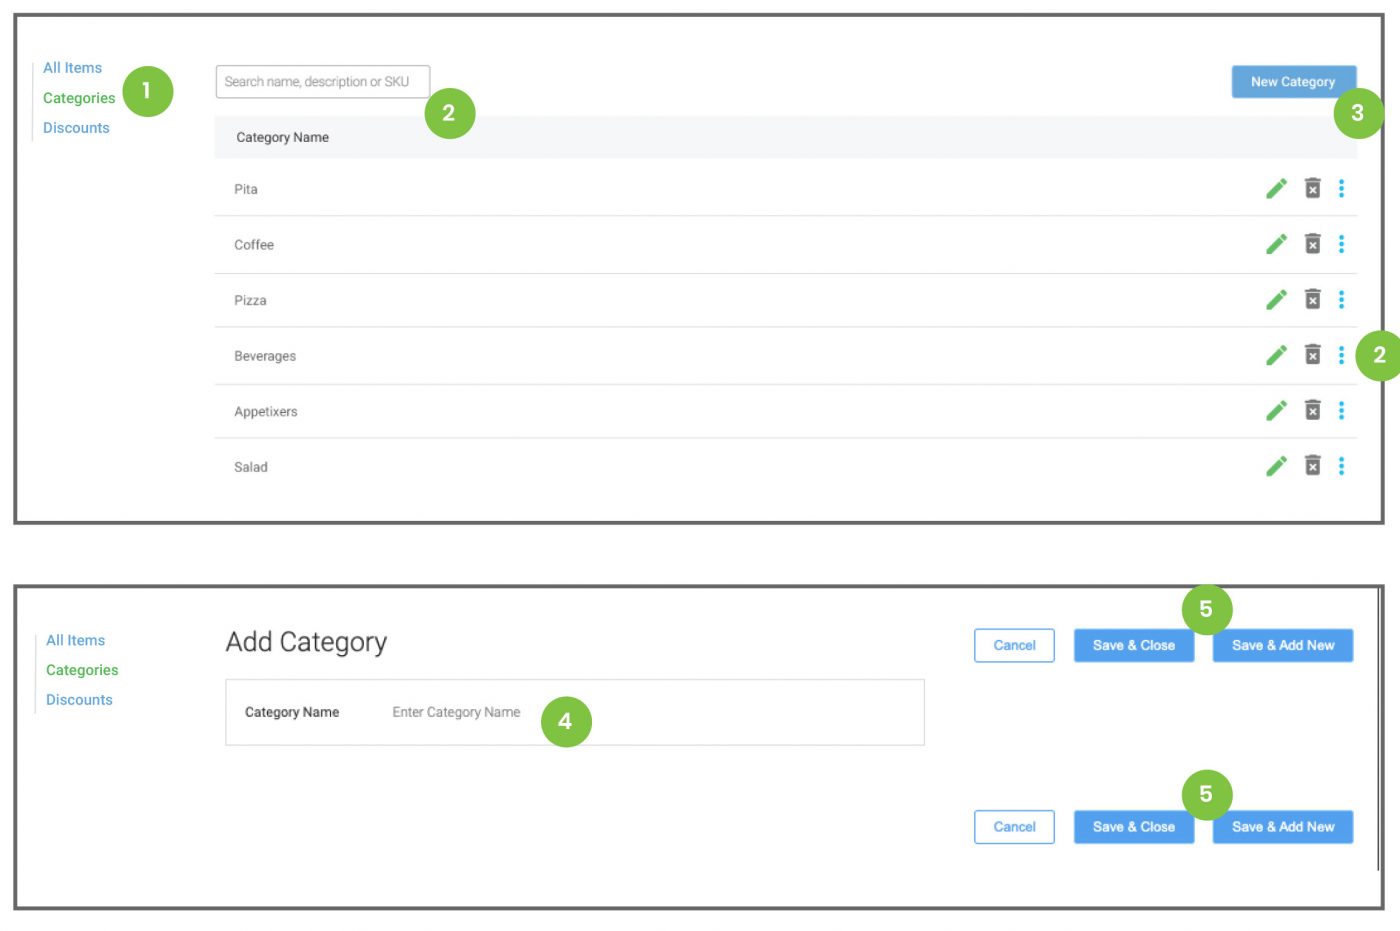
- Click the Categories option from the left side menu.
- Displayed results list categories by name. These can be custom sorted using the search field. Click the blue icon bar on an individual category item to View, Edit or Delete. Click the trash can icon to delete a category.
- Click the blue New Category button to create a new category.
- Enter Category Name.
- Click the blue Save & Close button to return to the category list. Click Save & Add New to continue creating categories.
Categories apply to items listed for sale on the Choice POS or the Online Ordering Platform. They currently do not apply to Portal items.
Create Items
From the Items tab, create and manage an extensive product menu.
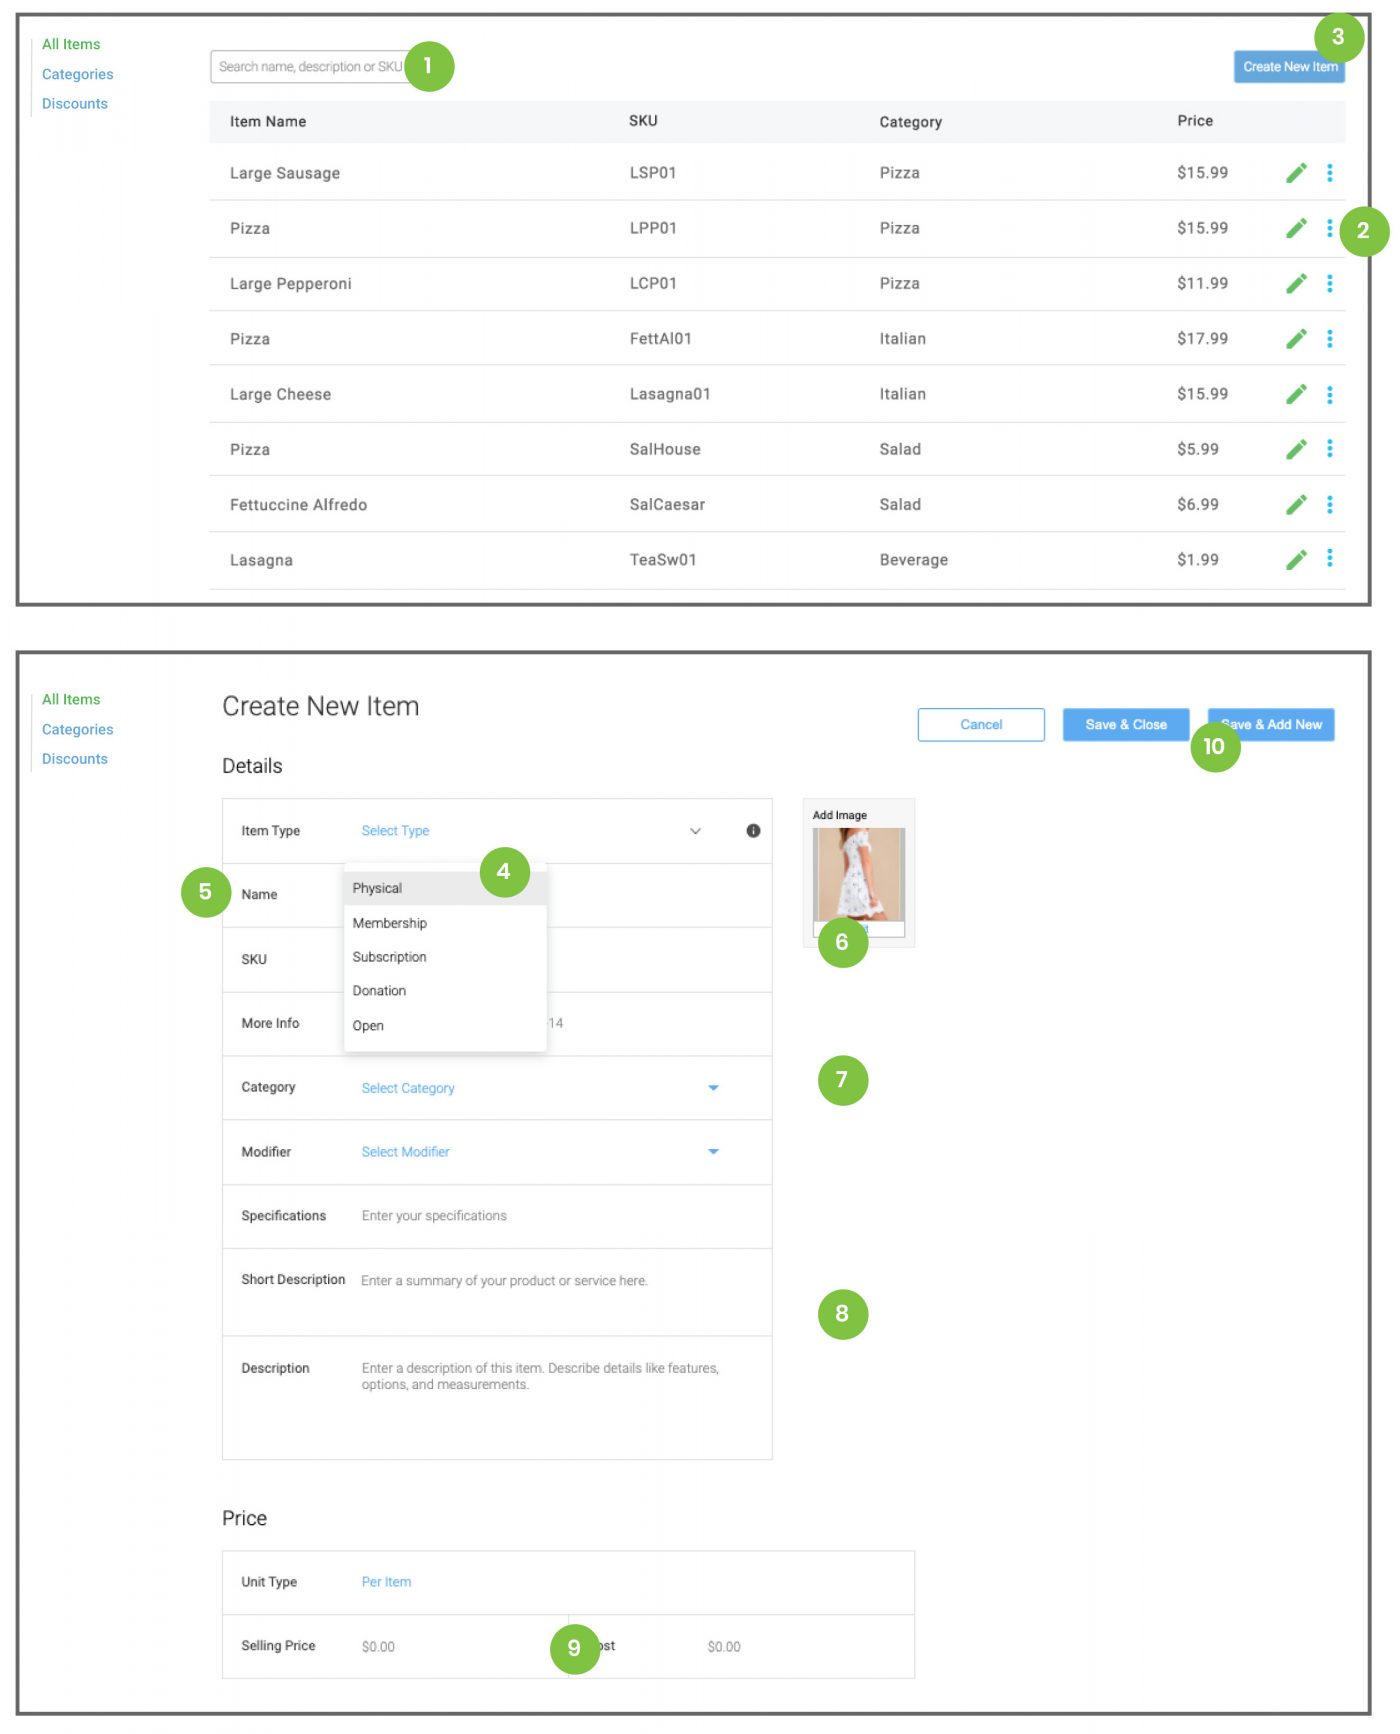
- Items list includes Name, Category, Price and SKU, if any. These can be custom sorted using the search field.
- Click the blue icon bar on an individual line item to View, Edit or Delete an item.
- Click the blue Create New Item button to manually add more items.
- Select the Item Type. Items to be sold through the portal should be labeled Physical. To take payment through a Payment Button, select one of the remaining options. See more detail on the next page
- Enter the Name of the item.
- Upload a product photo, add product SKU, UPC and other tracking information. Note: There is no reporting feature for inventory at this time. This is for memo purposes only.
- Click to select any Categories and Modifiers to apply to this product. Note: Multiple categories and modifiers can be added to a single item, but at least one category must be selected.
- Add Descriptions of the item. Note: These will only display in the Online Ordering platform.
- Set the Price of the item. Cost information can be entered, but this is for memo purposes only.
- Click the blue Save & Close button to return to the item list. Click Save & Add New to continue creating items.
Payment Buttons
Payment buttons are system generated links which direct customers to a hosted payments page or online checkout screen to complete a payment. Buttons can be created for single or recurring payments.
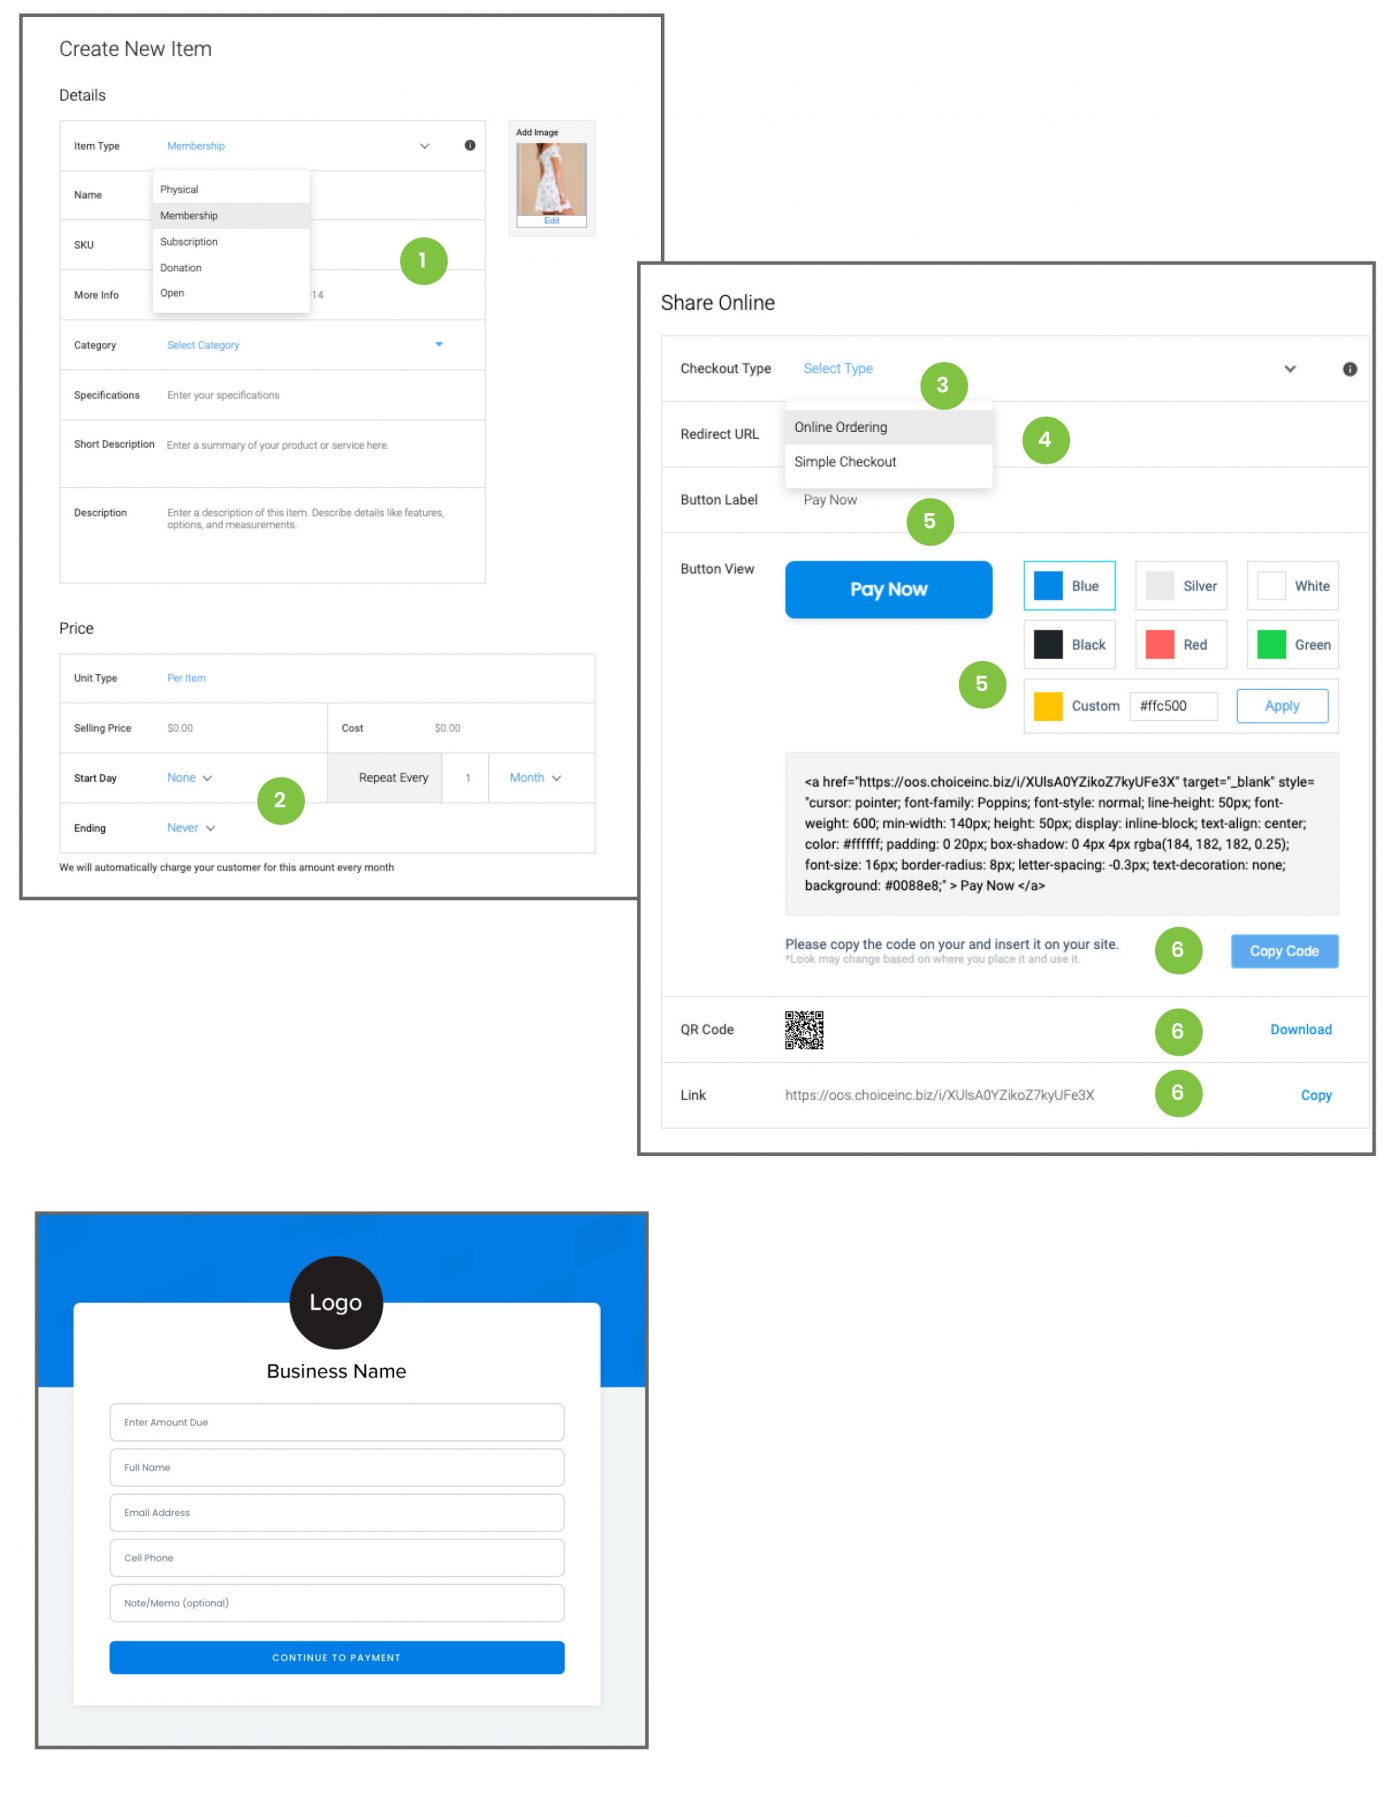
- Select the Item Type. Payment buttons set for a specific amount should be labeled Physical. To take a recurring payment through a Payment Button, select Membership or Subscription. To create a payment button which allows the customer to enter the amount to be paid (Open Payment) select Donation or Open. Complete the remaining Item fields
as needed.
Note: Payment buttons will apply the same transaction settings as any sale run through the portal. If the system is set to add tax to a sale, tax will be added to the payment amount in the button. This also applies for Cash Discount or Surcharge fees. The exception to this setting is the Donation button. No tax is added to the Donation payments. - If Membership or Subscription is selected as the Item Type, additional fields will appear in the Price section, prompting the user to create the Recurring Schedule. Select the Start Date, define the recurring schedule and chose when the payments should end. (Steps 3-5 on the Recurring Billing page)
Note: These settings will apply to any customer who clicks the link, regardless of the date they make the first payment. Keep the schedule settings as flexible as possible. For example, set the end date after a certain number of payments is made or leave it set as Never, to keep the schedule open ended. - The Share Online section of the Create Items screen dictates how a customer will be directed to make their payment.
Click the dropdown menu to select the Checkout type. Simple Checkout will direct the customer to a secure Hosted Payments Page where they can complete their payment. - The Redirect URL determines a site the customer is directed to once payment is complete. This is optional.
- Enter the button Name and select the Color for the Button View.
Click the blue Save & Close button. The system will now create the code for the payment button. Select the payment item from the Items tab to reopen the item screen and access the payment code. - The Share Online section now provides HTML code to create the button on a website, a QR code and Link which will direct the customer to the hosted payments page specified for this item. Copy or download the information.
Transactions
From the Portal Transactions screen review and export custom reports on completed transactions run through the portal, or the Choice POS. This can be accessed from the tab in the access bar at the top of the screen or the Transactions button in the left side menu.
Click any transaction to view details or resend the receipt.
- The transactions screen will default to reporting all transactions for the present month. Results can be revised by clicking to adjust the timeline. This can be sorted by any of the preset buttons on the right side of the pop up window. Custom settings can be created by clicking to move the blue highlighted bar to include the dates required.
- Select the Payment Method drop-down menu to choose a specific type of sale.
- Sort sales run on a connected device by choosing the option in the Terminal menu. Terminals not connected to the portal will not be listed.
- Use the Search field to find any specific information listed on screen.
- Click the Custom View menu to add or remove transaction information displayed on the screen.
- The Export button will open a pop-up window with additional categories to be added to the exported CSV file.
Reporting
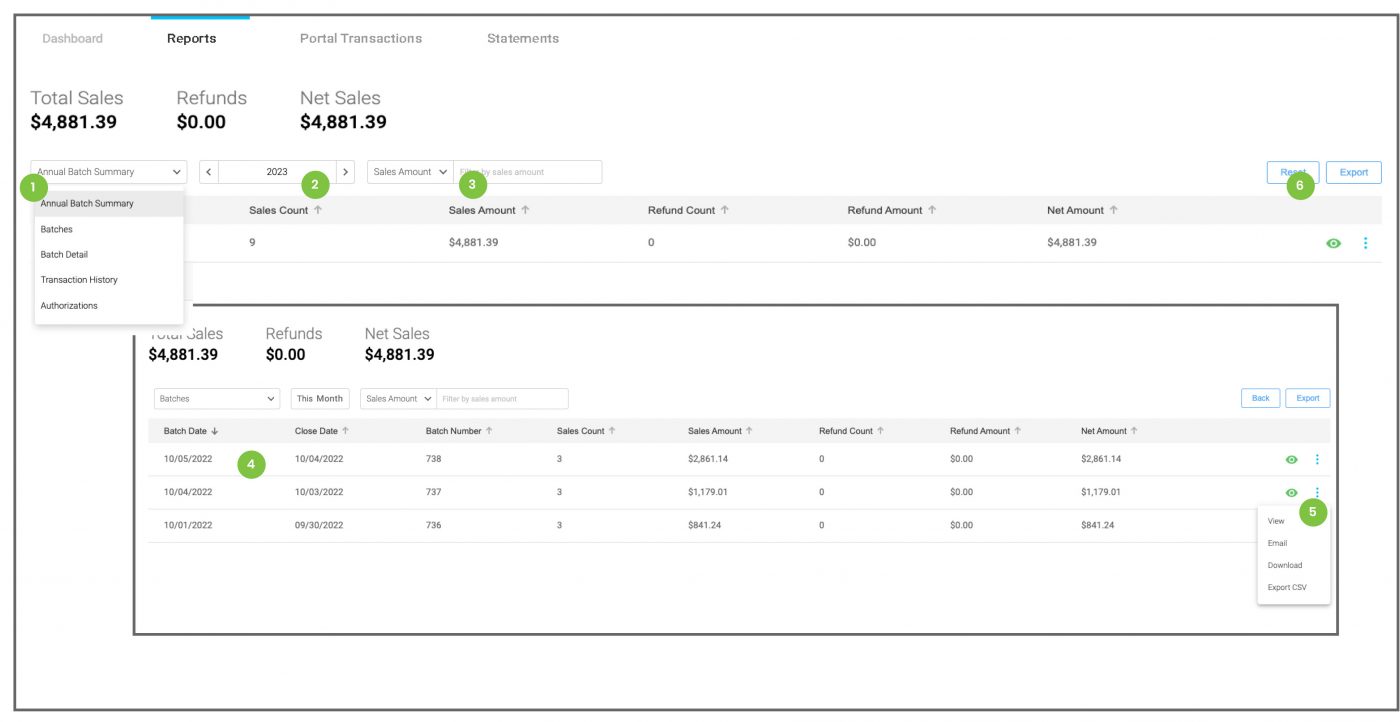
The Reports screen summarizes all transaction information including Annual summary, Batches, Batch Detail, Transaction History and Authorizations. It reflects transactions from standalone terminals and point of sale systems as well as batches from the eCommerce tab in the portal. This can be accessed from the tab in the access bar at the top of the screen or the Reports button in the left side menu.
- The initial range will reflect the Annual Summary. Other options are listed by batch, batch detail, transactions,
or by authorizations. - Filters can be added to search for a date range. This can be chosen
from several pre-set options or customized to specific dates. - Additional search field filters by Card #, Identifier #, Batch #, Sales
Amount and Net Amount. - Results are grouped by the search results. General search results display by month. Click each month to view the batches within that time. Click again to view the individual transactions within each batch. Transaction information includes Auth code, Card brand and Last four of the card.
- Click the blue icon bar on an individual line item to Email, Download or Export the information to a CSV.
- To export the entire screen results, click the Export button on the far right side of the screen.
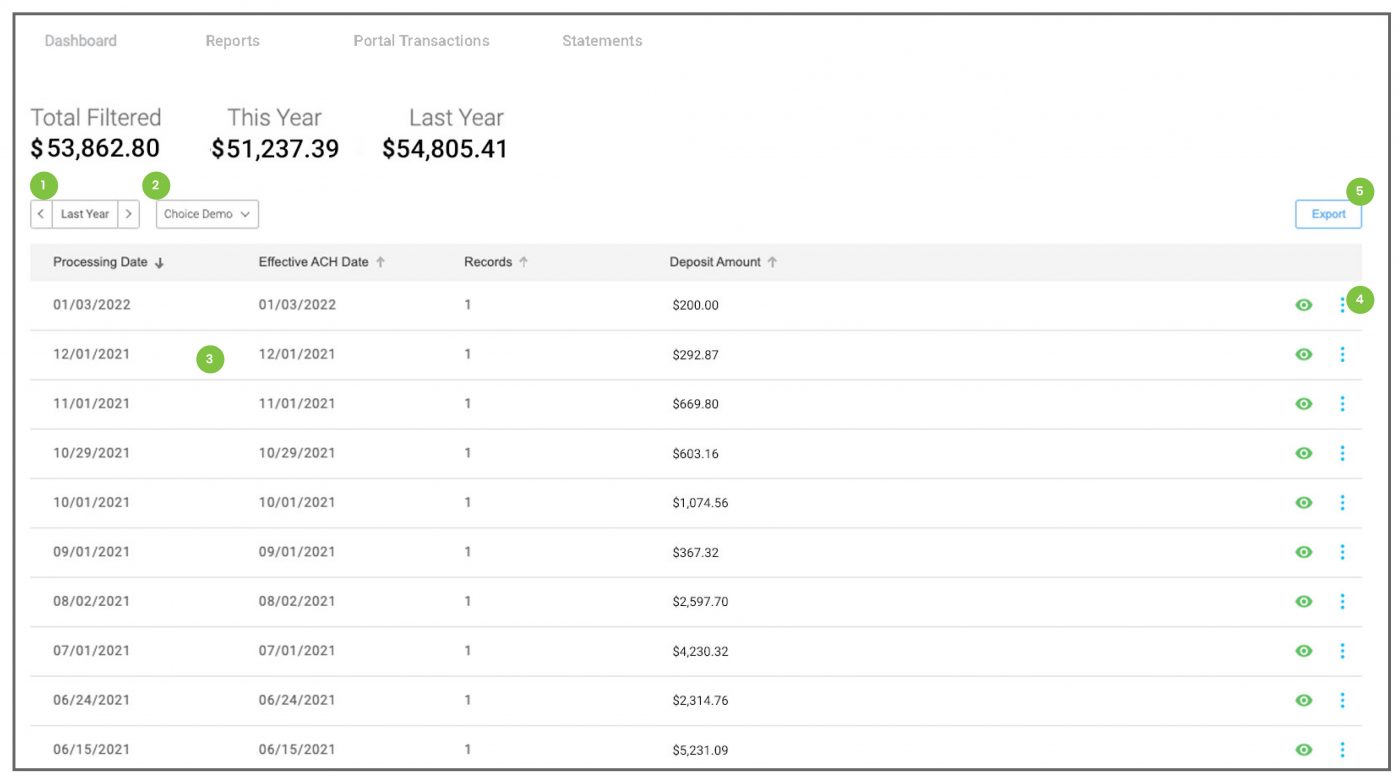
Deposits
The Deposits screen summarizes all deposits and debits related to processing costs, directly from elevate. This can be accessed from the Deposits button in the left side menu. It reflects deposits from standalone terminal and point of sale systems, the eCommerce tab in the portal as well as any debits for monthly fees.
1. Select the Date range. This can be chosen from several pre-set options or customized to specific dates.
2. Users with access to more than one account can select different accounts from the drop-down menu.
3. Results are listed in chronological order. Click on the individual line to see a line-by-line report for each day.
4. Click the blue icon bar on an individual line item to View, Email, Download or Export the information to a CSV
5. To export the entire screen results, click the Export button on the far right side of the screen. Users with access to more than one account will be given the option to export the same results for multiple accounts into a singel csv file.
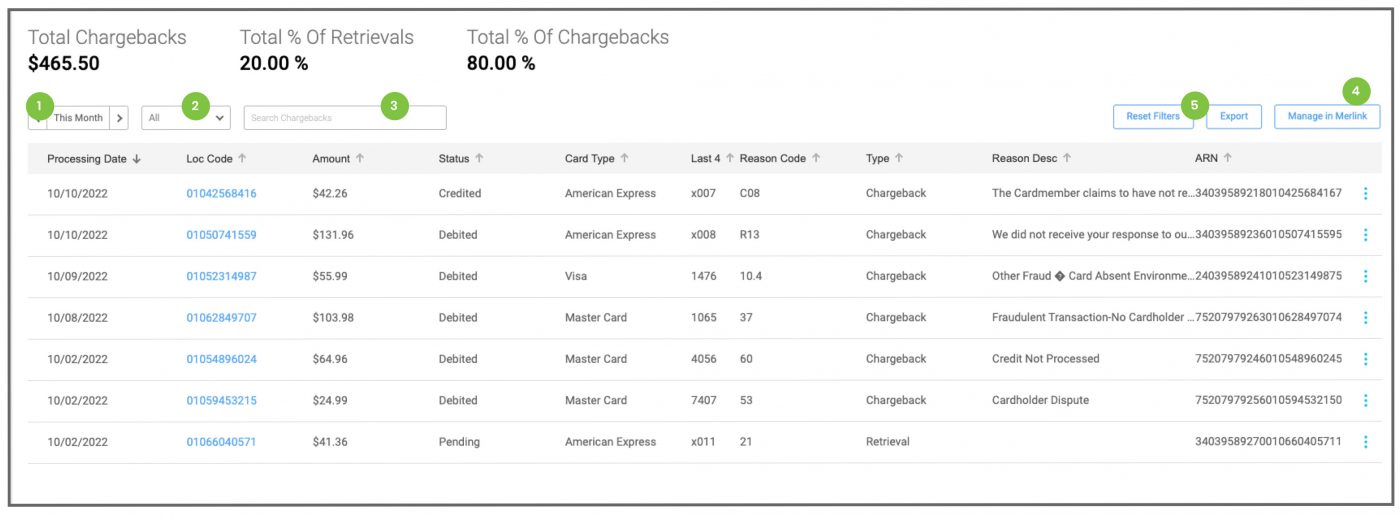
Chargebacks
Email notifications are sent to any merchant who receives a chargeback or retrieval request. The Chargebacks screen publishes information about any chargebacks or retrieval requests reported against a merchant account. Click the Chargebacks tab in the left side menu to view the screen.
- Select the Date range. This can be chosen from several pre-set options or customized to specific dates.
- Click the dropdown to select the type of report: Chargeback or Retrieval Request.
- Filters can be added to the search bar to search for specific words or numbers.
- Click the Export button to download this information in a CSV format.
- Click Manage in Merlink to open a new tab and login to the Merlik Portal. From there you can manage your chargebacks.
Manage Users
The Manage Users section of the portal will allow administrators to add and edit users in the merchant account.
View Users
- Click Manage Users in the Menu drawer. This will display all the users assigned to this account.
- Click the green Edit Icon or select the Edit option from the blue access icon to view or update user information.
- Select the Delete option from the blue access icon to delete a user from the portal.
- Enter information into the Search field to filter the list and find a specific user.
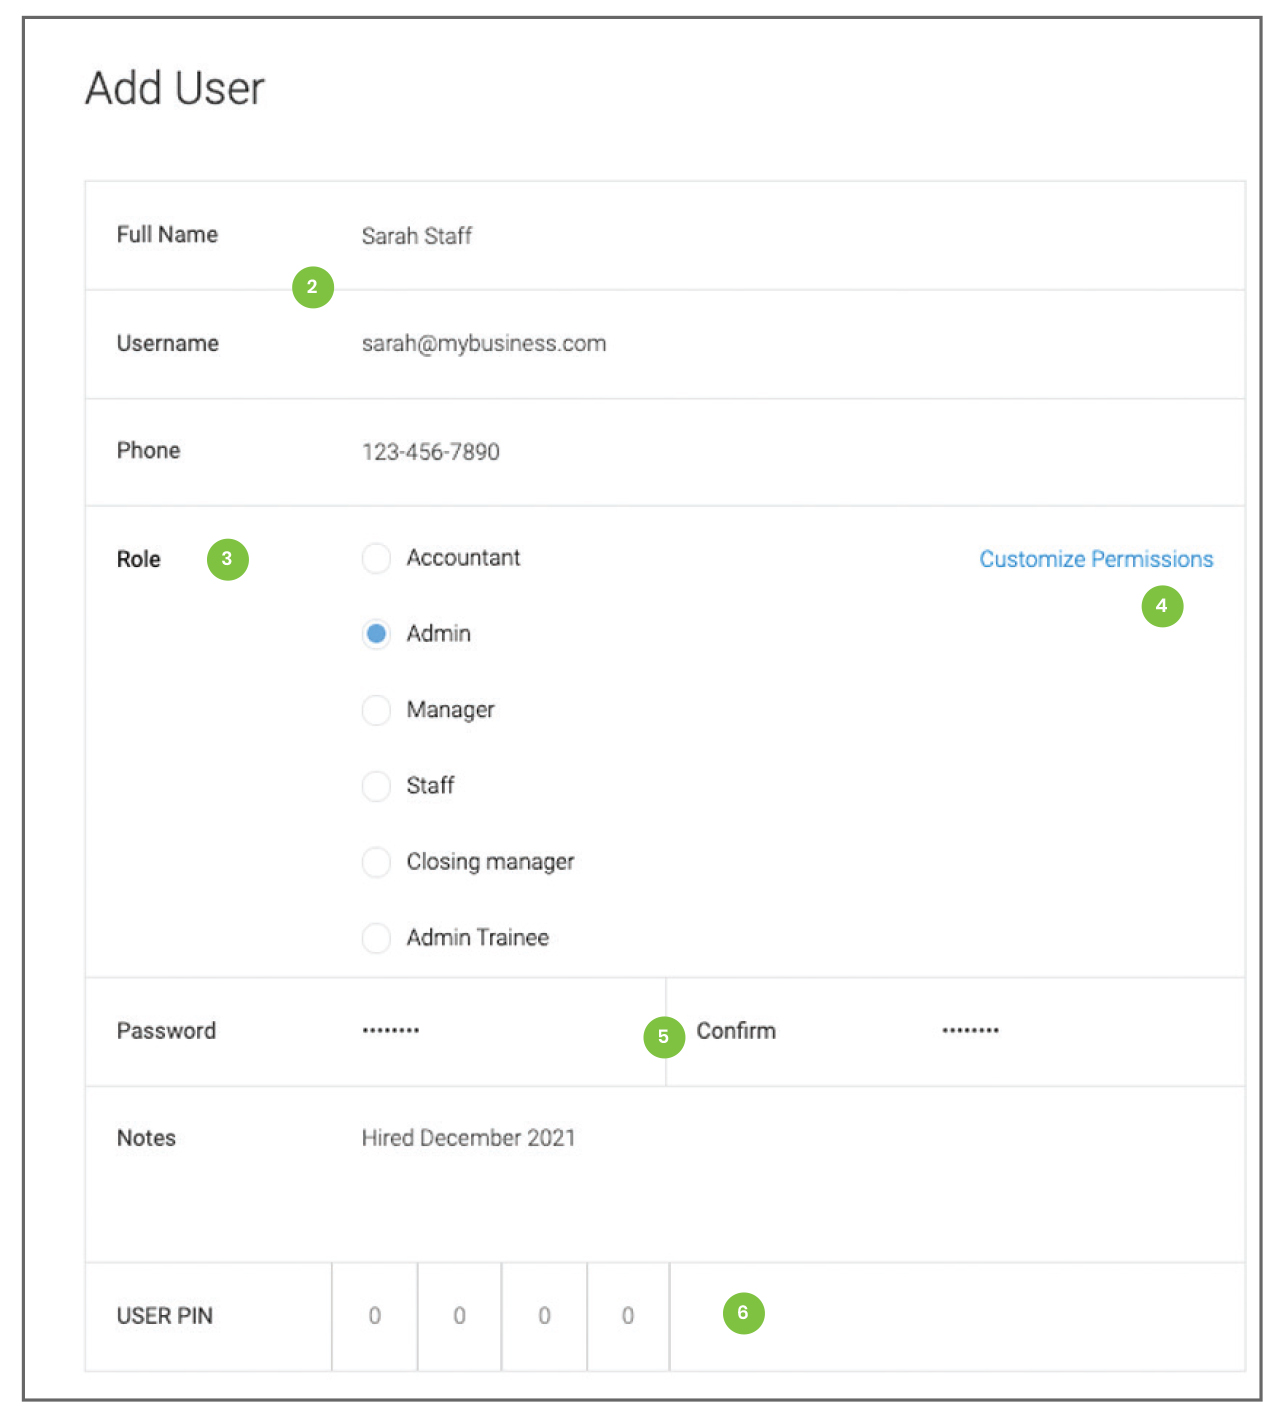
Create User
- Click on the blue Add New User button on the right side of the screen.
- Enter the Full Name and Email of the User.
* Note: The user’s email is their Username a unique email is required for each user. - In the Role section, click to select the desired Role. This will determine the access this user has within the portal.
* Note: Roles can be named, created, and edited in the - Once the role is selected, an option will appear to Customize Permissions. This allows the administrator to change the permissions of the assigned role for the individual user. No other users with that role will be affected.
If a role is customized, a new option will appear at the bottom of the Roles section labeled Custom. This option will be selected. To return to the original settings of the role, click to select that role again.
- Fill in the Password and Confirm Password fields with a temporary password for the new user. These two fields must match.
- The User PIN field is used to give the same access the Choice POS system. Click the blue Save button.
- The new user can now log into the Portal. Once they enter their username and password, they will be prompted to change their password. Once this is done, they will now have whatever access to the portal their role permits.
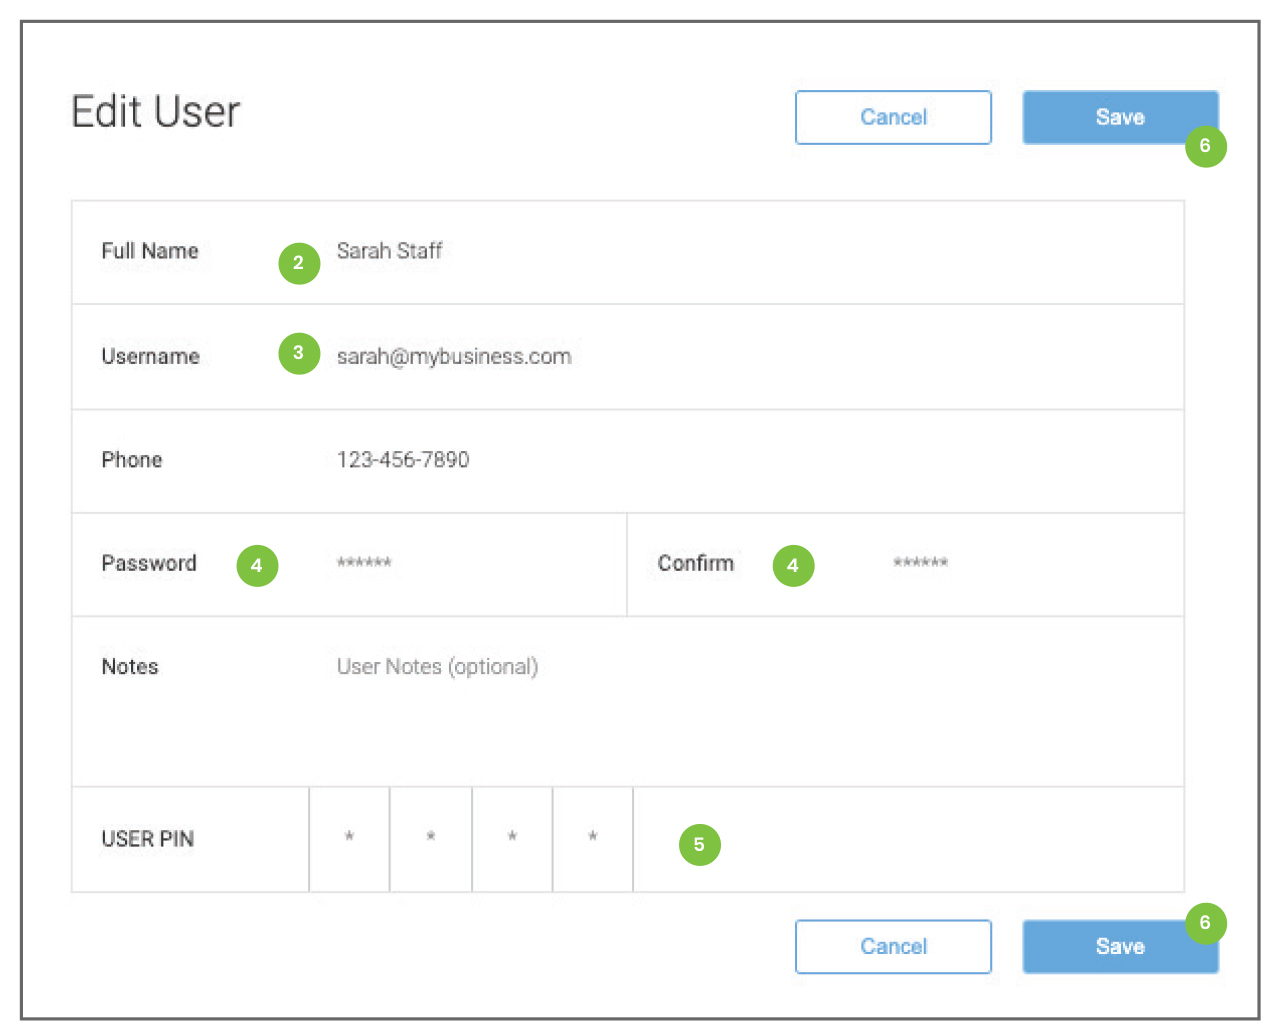
Update Users
The Manage Users section of the portal will allow users to update their profile information.
Edit or Update Users
- Click Manage Users in the Menu drawer. This will display the user profile, including the role assigned to the user and their contact information.
- Click the green Edit Icon or select the Edit option from the blue access icon to view or update user information.
- It is not possible to update the email address in the account. You must create a new user with a new email address.
- To change the user password, fill in the Password and Confirm Password fields with a temporary password.. These two fields must match.
- Enter or update the User PIN field to give the same access to the Choice POS system.
- Click the blue Save button.
- The user must now log out of the Portal and then log in again. Once the username and temporary password are entered, they will be prompted to change their password. The user password is now updated.
Roles & Permissions
User roles and permissions can be created and defined in the Settings tab. This is located at the bottom of the left side menu drawer and is only accessible by Managers.
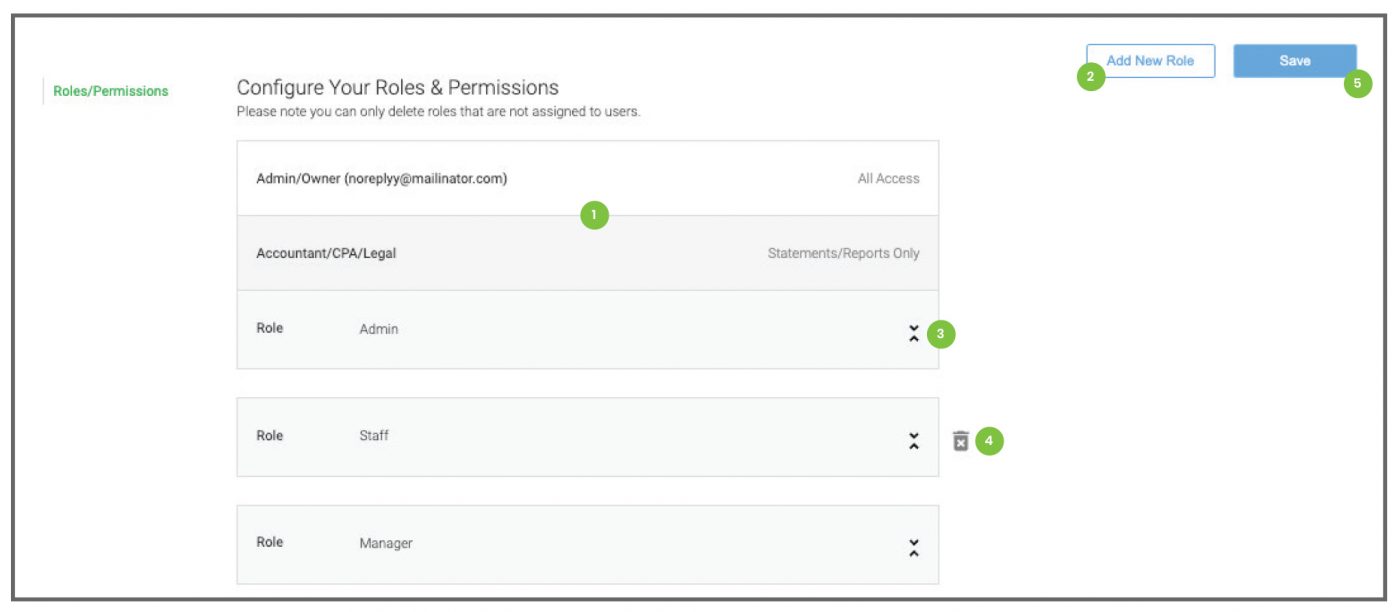
- The portal has two fixed roles: Admin/Owner and Accountant. These roles cannot be edited or deleted.
- To create additional roles, click the Add New Role button. From the Pop-up menu, name the role you want to create and choose the base template. The template options are Admin, Manager, and Employee. Admin has all-access, Manager has extensive but not complete access and Employee has more limited access. These can be used as they are or they can be customized further. Click the blue Save button to complete the initial role build.
- Once a role has been saved, click the arrows on the right side of the role listing. This will expand the list of permissions for this role. Check or uncheck the selections to add or remove access for that role. Click the blue Save button to complete the role definition. Click the arrows again to close the list.
- The Trash icon appears next to new roles. Roles can be removed at any time, as long as they are not assigned to the user. Once assigned, the trash icon will disappear. To make a role able to be deleted, any users with that role must be assigned a new role.
- Click the Save button to confirm all changes.
Location Settings
The Location Settings section in the Settings tab of the portal will allow Admins and users to update information that will appear on system communications like receipts and payment requests.
* Note: This information is not required.
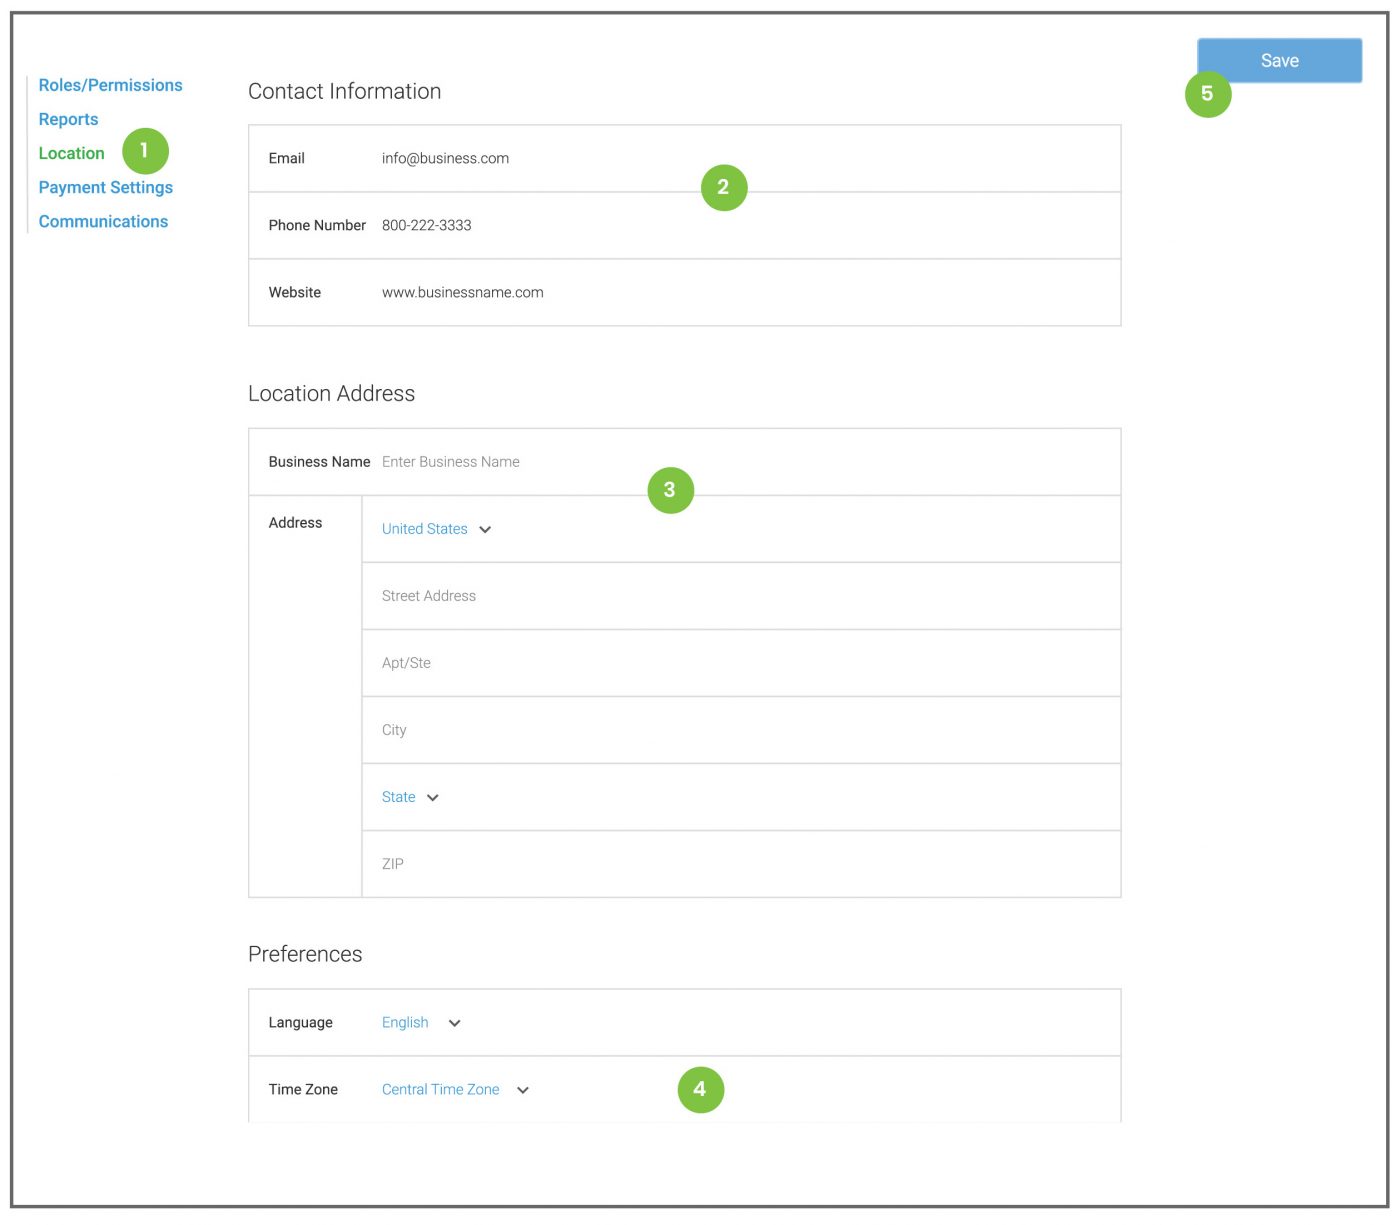
- Click the Location option from the left side menu.
- In the Contact Information section, enter the email address, phone number and Website which should be provided on any receipts or customer communications.
- In the Location Address section, enter the street address, City, State and Zip Code if this information should appear on any communications.
* Note: The business name will always appear on all communications. - Click to select the business Time Zone. This will manage the time stamp on your payment records.
- Click the blue Save button.
Payment Settings
The Payment Settings section in the Settings tab of the portal will allow Admins and users to update payment settings for all portal transactions.
* Note: This information is not required.
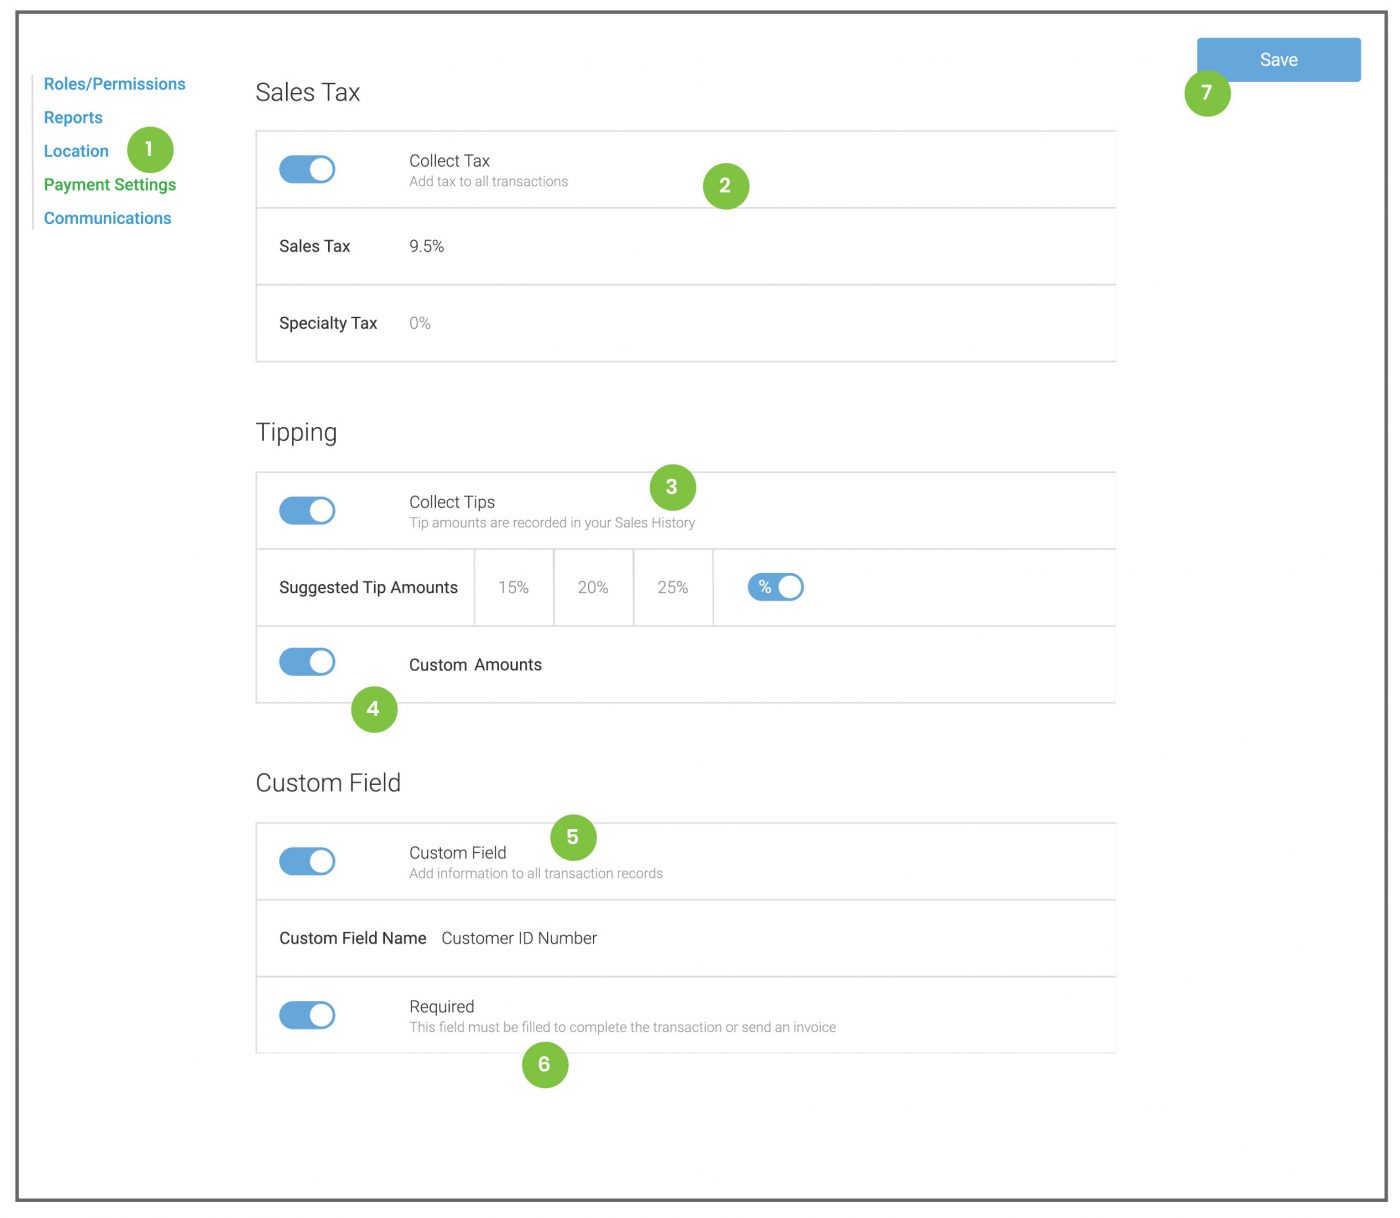
- Click the Payment option from the left side menu.
- In the Sales Tax section, toggle on the option to collect tax if sales tax needs to be added to all transactions. Two tax fields will appear. Enter the correct percentage of sales tax in the sales tax field. If an additional tax needs to be added to sales, enter the correct percentage in the specialty tax field. This will be combined with the sales tax percentage and charged to all sales.
- In the Tipping section, toggle on the option to collect tips if customers should be given the option to add a tip to any transactions. This will generate a tip field to the all portal sales screens. Toggle the selection for percentage or dollar amount in the suggested tip section and add any suggested tips amounts desired. This will add a prompt to all online payment screens, giving customers the ability to choose from a preset amount.
- Toggle on the Custom Amounts selection to include an additional field which will allow customers to enter a tip amount of their choosing.
- In the Custom Field section, toggle on the option to add a custom field to all transactions. Enter the name of the custom field in the Custom Field Name field. (eg. Patient Number or Customer ID) This will create an additional field on all transaction and invoice screens which will have the name that was entered.
* Note: If no information is entered in the Custom Field Name, the custom field will be named Custom Field. - Toggle on the Required selection to make the custom field a required element. This will make it mandatory for any user to enter information in this field before a sale can be completed or an invoice can be sent.
- Click the blue Save button.
Communication Settings
The Communications section in the Settings tab of the portal will allow Admins and users to control the information which will appear on all transaction communications.
* Note: This information is not required.
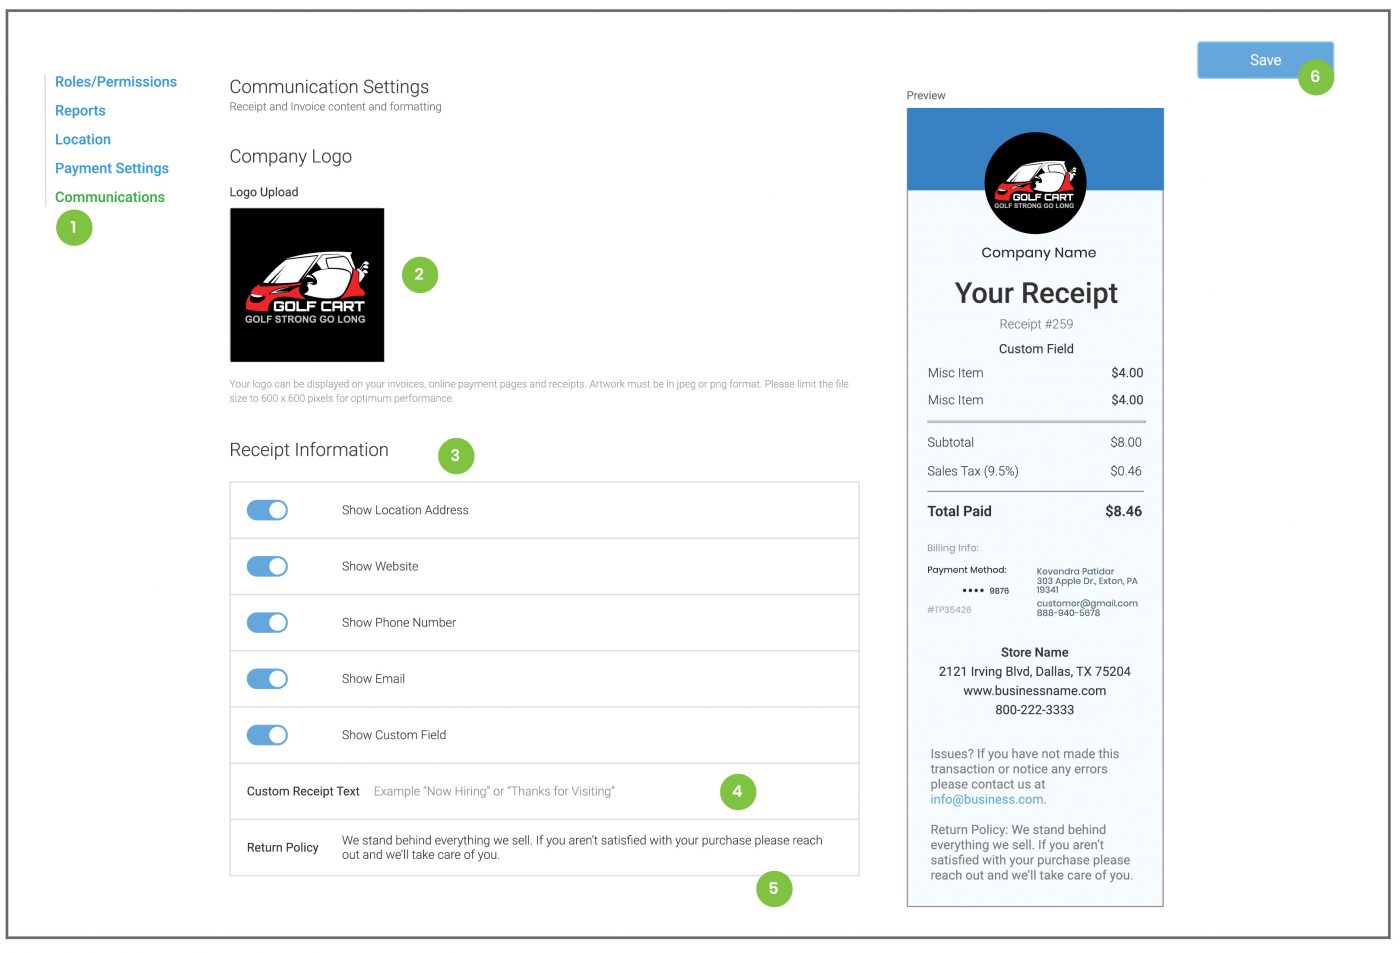
- Click the Communications option from the left side menu.
- In the Company Logo section, click to upload a logo to appear at the top of all electronic communications.
* Note: Artwork must be in jpeg or png format. Please limit the file size to 600 x 600 pixels for optimum performance.. - In the Receipt Information section, toggle on the selections for the information which should be displayed on any communications. As each toggle is activated, the information entered in the Location tab will appear in the receipt preview on the right side of the screen.
* Note: If none of the toggles are activated, all communications will display the business name.. - In the Custom Receipt text field, enter any messaging which should be added.
- In the Return Policy section, enter the return policy specific to the business.
- Click the blue Save button to apply any changes.
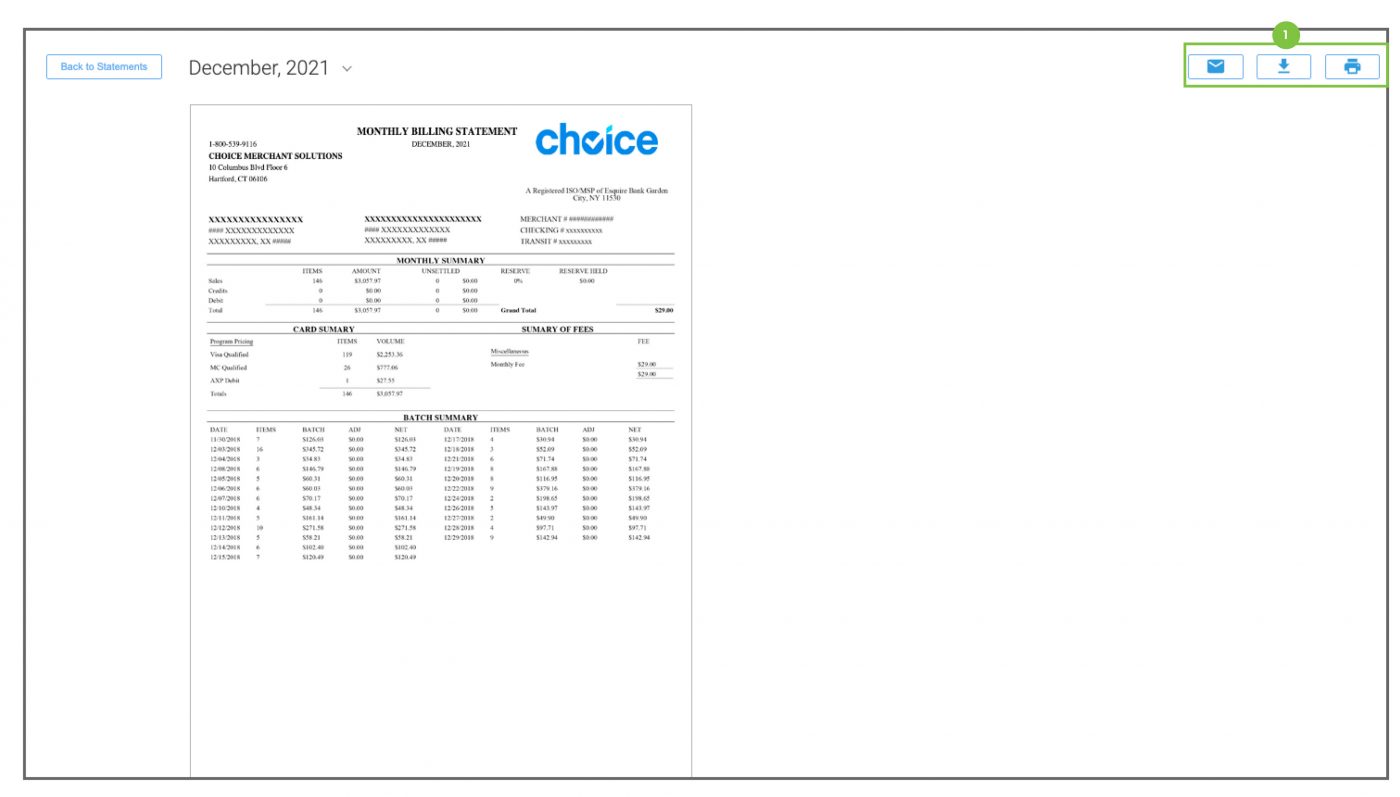
Statements
The Statements screen publishes the monthly processing statements. Click the Statements tab in the access bar at the top of the screen, or the button located in the left side menu to view the screen. Users can click on any statement in the list and review the details of any expenses billed to their account.
- Statements can be Emailed, Downloaded in pdf format, or Printed at any time.
Frequently Asked Questions
What is Run a Sale?
Run a Sale and Invoicing are eCommerce payment functions that can be added to the Business Portal. If you are interested in adding these payment options to your account, please contact your agent or reach out to Choice Customer Support.
I forgot my password
Click the Forgot Password link on the login screen. Enter the email address of the user trying to log in. A temporary password to the email address on file. Return to the log-in screen and enter the username and temporary password. The screen will prompt the user to create and confirm a new password. The password is now changed and the user may log in again.